攻击机:
192.168.1.102 Debian
靶机:
192.168.1.2 Windows 7
192.168.1.115 Windows 2003
192.168.1.119 Windows 2003
第一季主要介绍scanner下的五个模块,辅助发现内网存活主机,分别为:
- auxiliary/scanner/discovery/arp_sweep
- auxiliary/scanner/discovery/udp_sweep
- auxiliary/scanner/ftp/ftp_version
- auxiliary/scanner/http/http_version
- auxiliary/scanner/smb/smb_version
第二季主要介绍scanner下的五个模块,辅助发现内网存活主机,分别为:
- auxiliary/scanner/ssh/ssh_version
- auxiliary/scanner/telnet/telnet_version
- auxiliary/scanner/discovery/udp_probe
- auxiliary/scanner/dns/dns_amp
- auxiliary/scanner/mysql/mysql_version
第三季主要介绍scanner下的五个模块,辅助发现内网存活主机,分别为:
- auxiliary/scanner/netbios/nbname
- auxiliary/scanner/http/title
- auxiliary/scanner/db2/db2_version
- auxiliary/scanner/portscan/ack
- auxiliary/scanner/portscan/tcp
第四季主要介绍scanner下的五个模块,辅助发现内网存活主机,分别为:
- auxiliary/scanner/portscan/syn
- auxiliary/scanner/portscan/ftpbounce
- auxiliary/scanner/portscan/xmas
- auxiliary/scanner/rdp/rdp_scanner
- auxiliary/scanner/smtp/smtp_version
- auxiliary/scanner/pop3/pop3_version
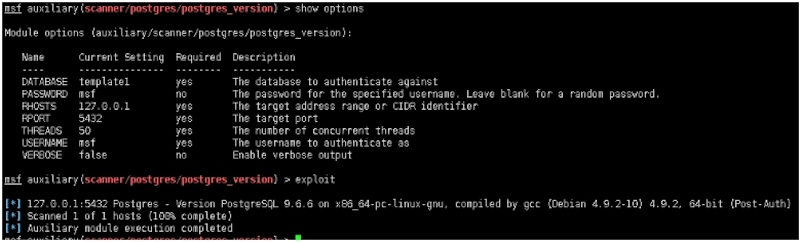
- auxiliary/scanner/postgres/postgres_version
- db_nmap
Module options (auxiliary/scanner/postgres/postgres_version):Name Current Setting Required Description‐‐‐‐ ‐‐‐‐‐‐‐‐‐‐‐‐‐‐‐ ‐‐‐‐‐‐‐‐ ‐‐‐‐‐‐‐‐‐‐‐DATABASE template1 yes The database to authenticate againstPASSWORD msf no The password for the specified username. Leave blank for a random password.RHOSTS 127.0.0.1 yes The target address range or CIDR identifierRPORT 5432 yes The target portTHREADS 50 yes The number of concurrent threadsUSERNAME msf yes The username to authenticate asVERBOSE false no Enable verbose outputmsf auxiliary(scanner/postgres/postgres_version) > exploit[*] 127.0.0.1:5432 Postgres ‐ Version PostgreSQL 9.6.6 on x86_64‐pc‐li[*] Scanned 1 of 1 hosts (100% complete)[*] Auxiliary module execution completed
MSF内置强大的端口扫描工具Nmap,为了更好的区别,内置命令为:db_nmap,并且会自动存储nmap扫描结果到数据库中,方便快速查询已知存活主机,以及更快捷的进行团队协同作战,使用方法与nmap一致。也是在实战中最常用到的发现内网存活主机方式之一。
例:
msf exploit(multi/handler) > db_nmap ‐p 445 ‐T4 ‐sT 192.168.1.115‐120‐‐open[*] Nmap: Starting Nmap 7.70 ( https://nmap.org ) at 2019‐02‐17 15:17 EST[*] Nmap: Nmap scan report for 192.168.1.115[*] Nmap: PORT STATE SERVICE[*] Nmap: 445/tcp open microsoft‐ds[*] Nmap: MAC Address: 00:0C:29:AF:CE:CC (VMware)[*] Nmap: Nmap scan report for 192.168.1.119[*] Nmap: Host is up (0.0026s latency).[*] Nmap: PORT STATE SERVICE[*] Nmap: 445/tcp open microsoft‐ds[*] Nmap: MAC Address: 00:0C:29:85:D6:7D (VMware)[*] Nmap: Nmap done: 6 IP addresses (2 hosts up) scanned in 13.35 seconds
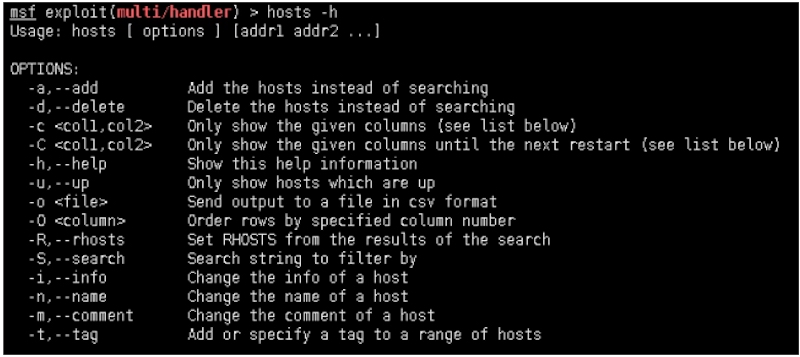
命令hosts查看数据库中已发现的内网存活主机
同样hosts命令也支持数据库中查询与搜索,方便快速对应目标存活主机。
Usage: hosts [ options ] [addr1 addr2 ...]OPTIONS:‐a,‐‐add Add the hosts instead of searching‐d,‐‐delete Delete the hosts instead of searching‐c <col1,col2> Only show the given columns (see list below)‐C <col1,col2> Only show the given columns until the next restart (see list below)‐h,‐‐help Show this help information‐u,‐‐up Only show hosts which are up‐o <file> Send output to a file in csv format‐O <column> Order rows by specified column number‐R,‐‐rhosts Set RHOSTS from the results of the search‐S,‐‐search Search string to filter by‐i,‐‐info Change the info of a host‐n,‐‐name Change the name of a host