Building a Theme
In this section, you’ll learn how to structure folders and configure Yarn workspaces to develop Gatsby themes. You’ll create two workspaces, and site.
Each workspace can be run separately, as well as one depending on the other. In this example, gatsby-theme-events will be a dependency of site.
Title your folder anything you wish. This example will use authoring-themes-tutorial.
Add a package.json
Create a package.json file in the new directory, with the following contents:
Set up gatsby-theme-events and site
In the authoring-themes-tutorial folder, create two new folders, gatsby-theme-events, and site.
Create a package.json file in each of the new folders. Your file tree will look like this:
In the package.json file in gatsby-theme-events, add the following:
- The
"name"corresponds to the yarn workspace you defined earlier, in the root-levelpackage.jsonfolder. - Because you’ll install
gatsby-theme-eventsas a package, you have to specify a"main"entry point.- This file won’t do anything, but it does need to resolve, so create a new file in
gatsby-theme-eventscalledindex.js.
- This file won’t do anything, but it does need to resolve, so create a new file in
This file is intentionally empty — because the main field is pointing to index.js, this file needs to exist for Node to properly resolve the package. To avoid confusion, add a small comment to indicate that the file doesn’t do anything; it just needs to exist and was left blank on purpose.
In the package.json file in site, add the following:
"private"is set to true, because you won’t be publishing the site to npm.- The
"name"again corresponds to the yarn workspace you defined earlier, in the root-levelpackage.jsonfolder.
Add dependencies to site
Now add gatsby, react, react-dom, and gatsby-theme-events as dependencies in site:
- When you run
yarn workspace site, it’s as if you were running that command while in the/sitedirectory. The dependencies will be added tosite, even though you’re not in thesitedirectory. - You’re installing
gatsby-theme-events@*, because you need the workspace to reference the unpublishedgatsby-theme-eventstheme.
💡 For more details on using yarn workspaces, you might be interested to check out Gatsby’s .
You should now see the following dependencies in your site/package.json:
If you run yarn workspaces info, you’ll be able to verify that the site is using the gatsby-theme-events from the workspace.
Add peer dependencies to gatsby-theme-events
Targeting the gatsby-theme-events workspace, install gatsby, react, and react-dom as peer dependencies:
Add development dependencies to gatsby-theme-events
During development, you’ll use your theme as a regular Gatsby site, so you’ll also set gatsby, react, and react-dom as dev dependencies:
💡 The
-Pflag is shorthand for installing peer dependencies, and the-Dflag is shorthand for installing dev dependencies.
The gatsby-theme-events/package.json file should now include the following:
Run site and gatsby-theme-events
Run both site and gatsby-theme-events to verify that they’re working.
In both cases, you should see a Gatsby site successfully running in development mode. Since there’s no content, visiting the site should serve a default Gatsby 404 page.
Add static data to a theme
In this example, you’ll source data from a YAML file into the gatsby-theme-events theme.
In the gatsby-theme-events directory, create a new data directory. Inside that, create a new file, events.yml.
Add some sample data:
To read this YAML data, you’ll need to install a few more dependencies:
💡
gatsby-source-filesystemwill let you load theevents.ymlfile.gatsby-transformer-yamlwill let you parse it as YAML data.
Create a gatsby-config.js file in the gatsby-theme-events directory:
With this saved, restart the dev server:
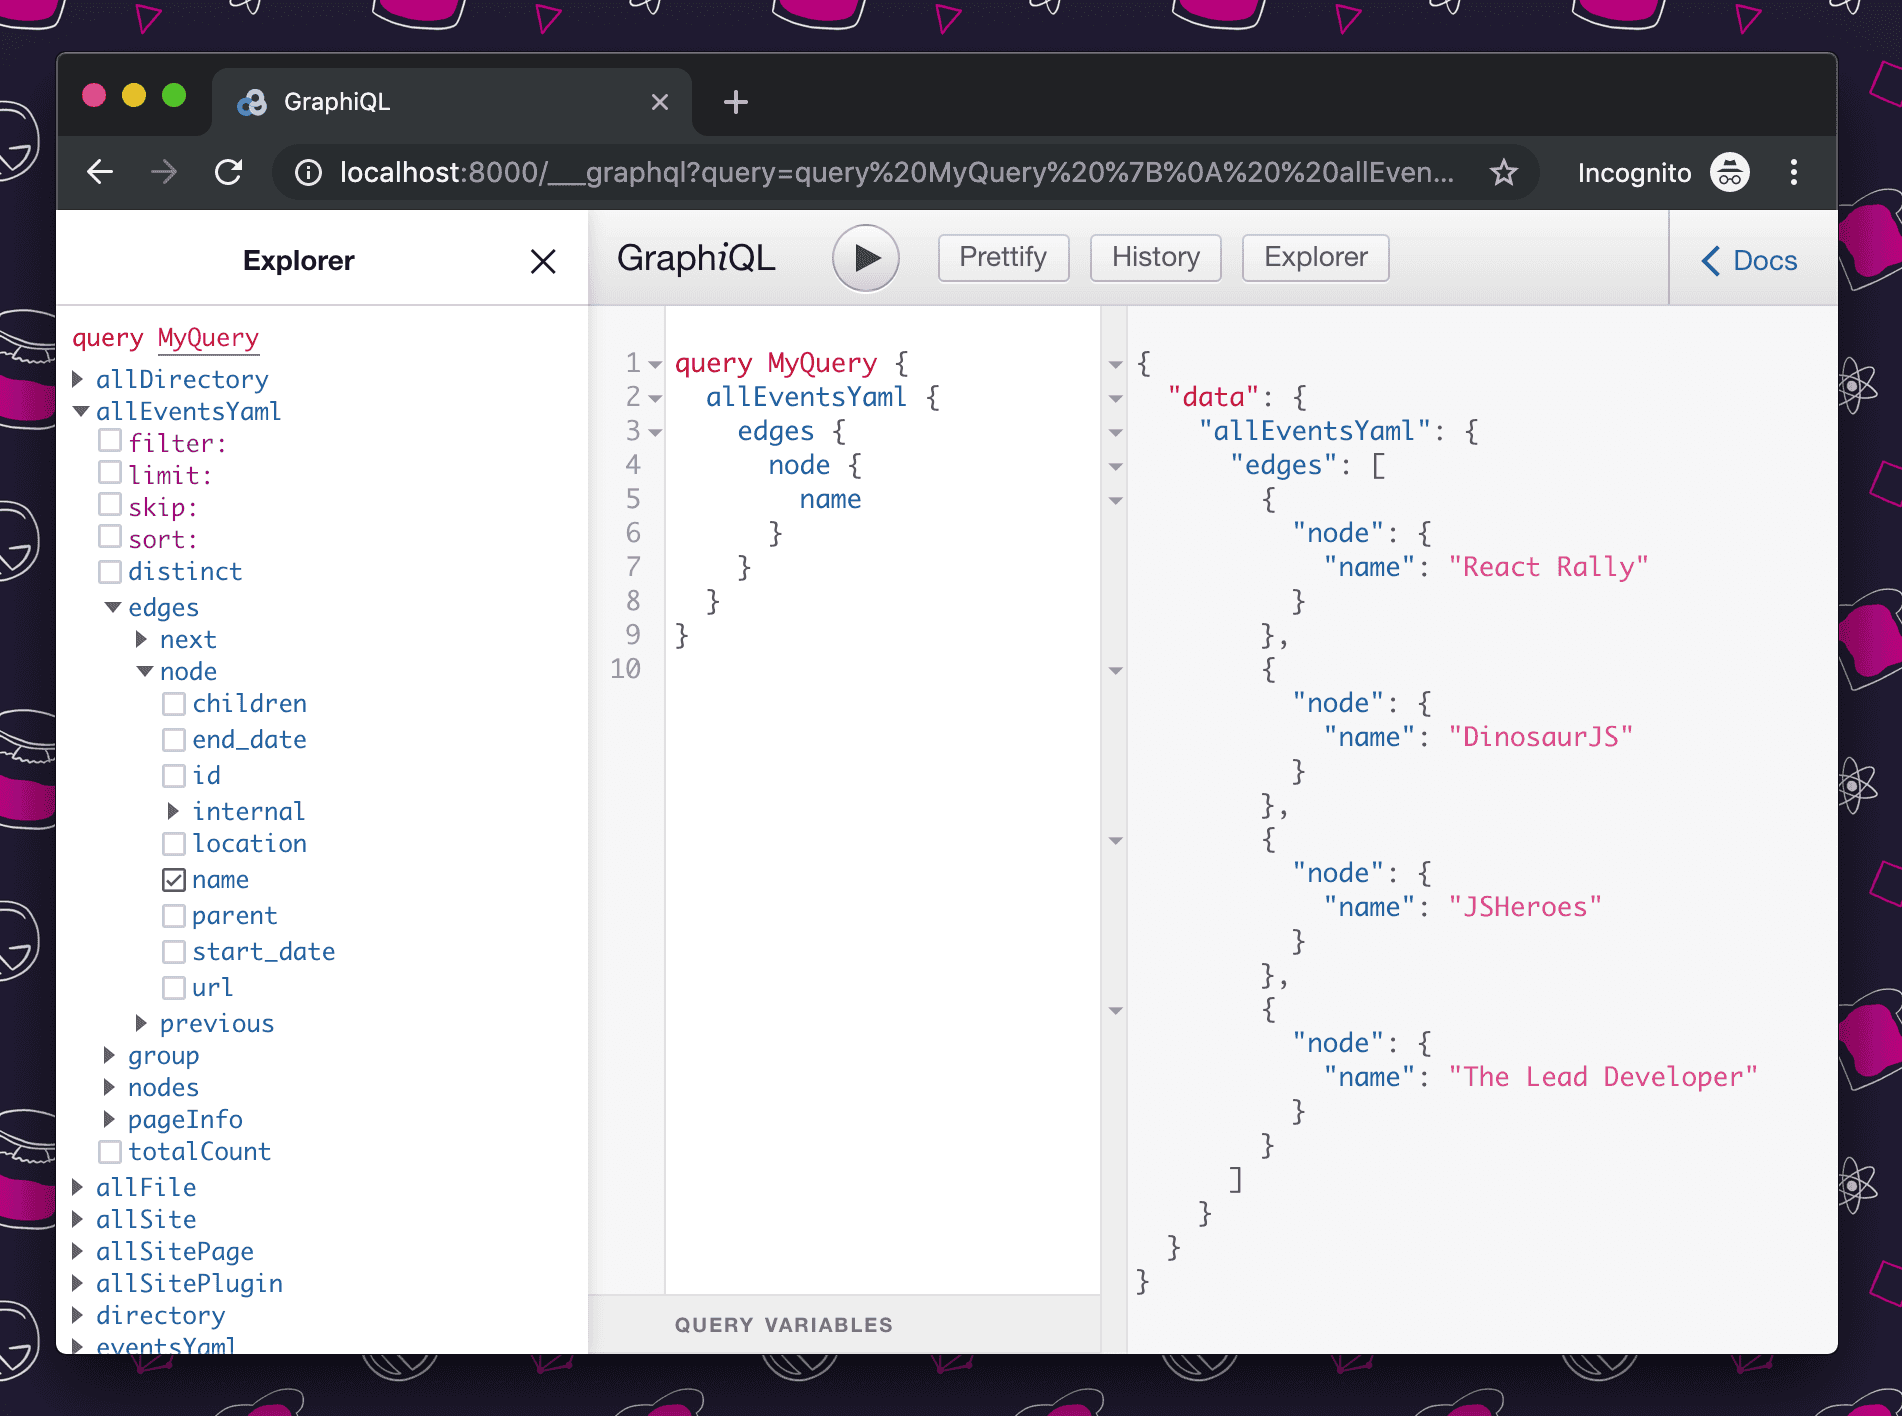
Open up the GraphiQL explorer for the site, and make a test query on allEvent:
When you execute the query, you should see the GraphQL server successfully return four event names:
Create a data directory using the onPreBootstrap lifecycle
Create a gatsby-node.js file in gatsby-theme-events.
If you fire up your theme, and the “data” directory doesn’t exist, gatsby-source-filesystem will throw an error. To guard against this, you’ll use the onPreBootstrap API hook to check if the data directory exists, and, if not, create it:
Set up to create data-driven pages
To actually create pages, you’ll need to:
- Define the
Eventtype - Define resolvers for custom fields on the
Eventtype - Query for events
Define the “Event” type
- You’ll use the
createTypesto create the new type - The
Eventtype will implement the typical GatsbyNodeinterface. - In addition to an
idfield, you’ll create new fields for each data point associated with an event (name, location, startDate, endDate, url). To read more detail about creating types, check out thecreateTypesdocumentation. - You’ll also create a
slugfield. You’ll notice your event data doesn’t include “slug” data. You’ll define this in the next step.
Define resolvers for any custom fields (slug)
Gatsby provides a createResolvers API hook. That gives you a function called createResolvers. Inside this function, you will set up a base path.
Here’s a deeper look at what’s happening in this createResolvers API hook.
You’ll default the basePath to the root path ("/"):
You’ll define a helper, slugify to help generate the slugs:
Then you’ll define a resolver for the slug field, on the Event type:
Test that this is working by running gatsby-theme-events again:
If you query this time for allEvent, you’ll see the Event data, including the new slugs:

Create data-driven pages using GraphQL and createPages
The last step in gatsby-node.js is to create pages for both the event previews and individual event pages. To do that, you’ll use the createPages API hook.
💡 Note that the previous contents of
gatsby-node.jsshould be left intact; they are omitted from the code snippets in this section for brevity.
Set up the call to create the root page
- You’ll default the
basePathto the root path ("/") - Then you’ll set up the call to the
createPageaction to create a page at the base path.- Note that the component listed doesn’t exist yet — you’ll create that shortly.
- You’ll retrieve all events, sorted by start date, in ascending order.
- You’ll handle the error, in case the GraphQL query failed.
Create a page for each event
- You’ll grab the event nodes queried from GraphQL.
- You’ll loop over all the events that were returned, and use
createPageto create a page for each event.- Note the “wishful programming” again —
"./src/templates/event.js"doesn’t exist yet.
- Note the “wishful programming” again —
Create the “events” and “event” template components.
The last step to make sure that these pages build is to create the page template components.
Create new files for the event template, and the events template:
Events template
Event template
Test that pages are building
You should see the placeholder events.js component at http://localhost:8000/.
If you hit (for example — or any route that doesn’t exist) you should see a listing of event pages, all building with the placeholder event.js component.
To show event data, you’ll import graphql and useStaticQuery from Gatsby in the events.js component.
Refactor the EventsTemplate component to include a static query for events data:
Create the UI to display event data
Start creating the UI to display the event data.
Create a general layout component
Create a new file at gatsby-theme-events/src/components/layout.js:
Create an events list component
Create a new file at gatsby-theme-events/src/components/event-list.js:
For now, this component will display a stringified object from the JSON data you send it on the events prop.
Add the layout and events list components to the events page
By updating the events.js template with the following code, you will:
- Import the two new components.
- Refactor the
rendermethod to use the new components, and give the<EventList>component the events data.
To test that it’s working, open up http://localhost:8000/ again. You should see the “Gatsby Events Theme” header from <Layout> component, and the stringified event data from the <EventList> component.
Update the event list component
Update the event list component to use the event data in markup, rather than displaying the raw data:
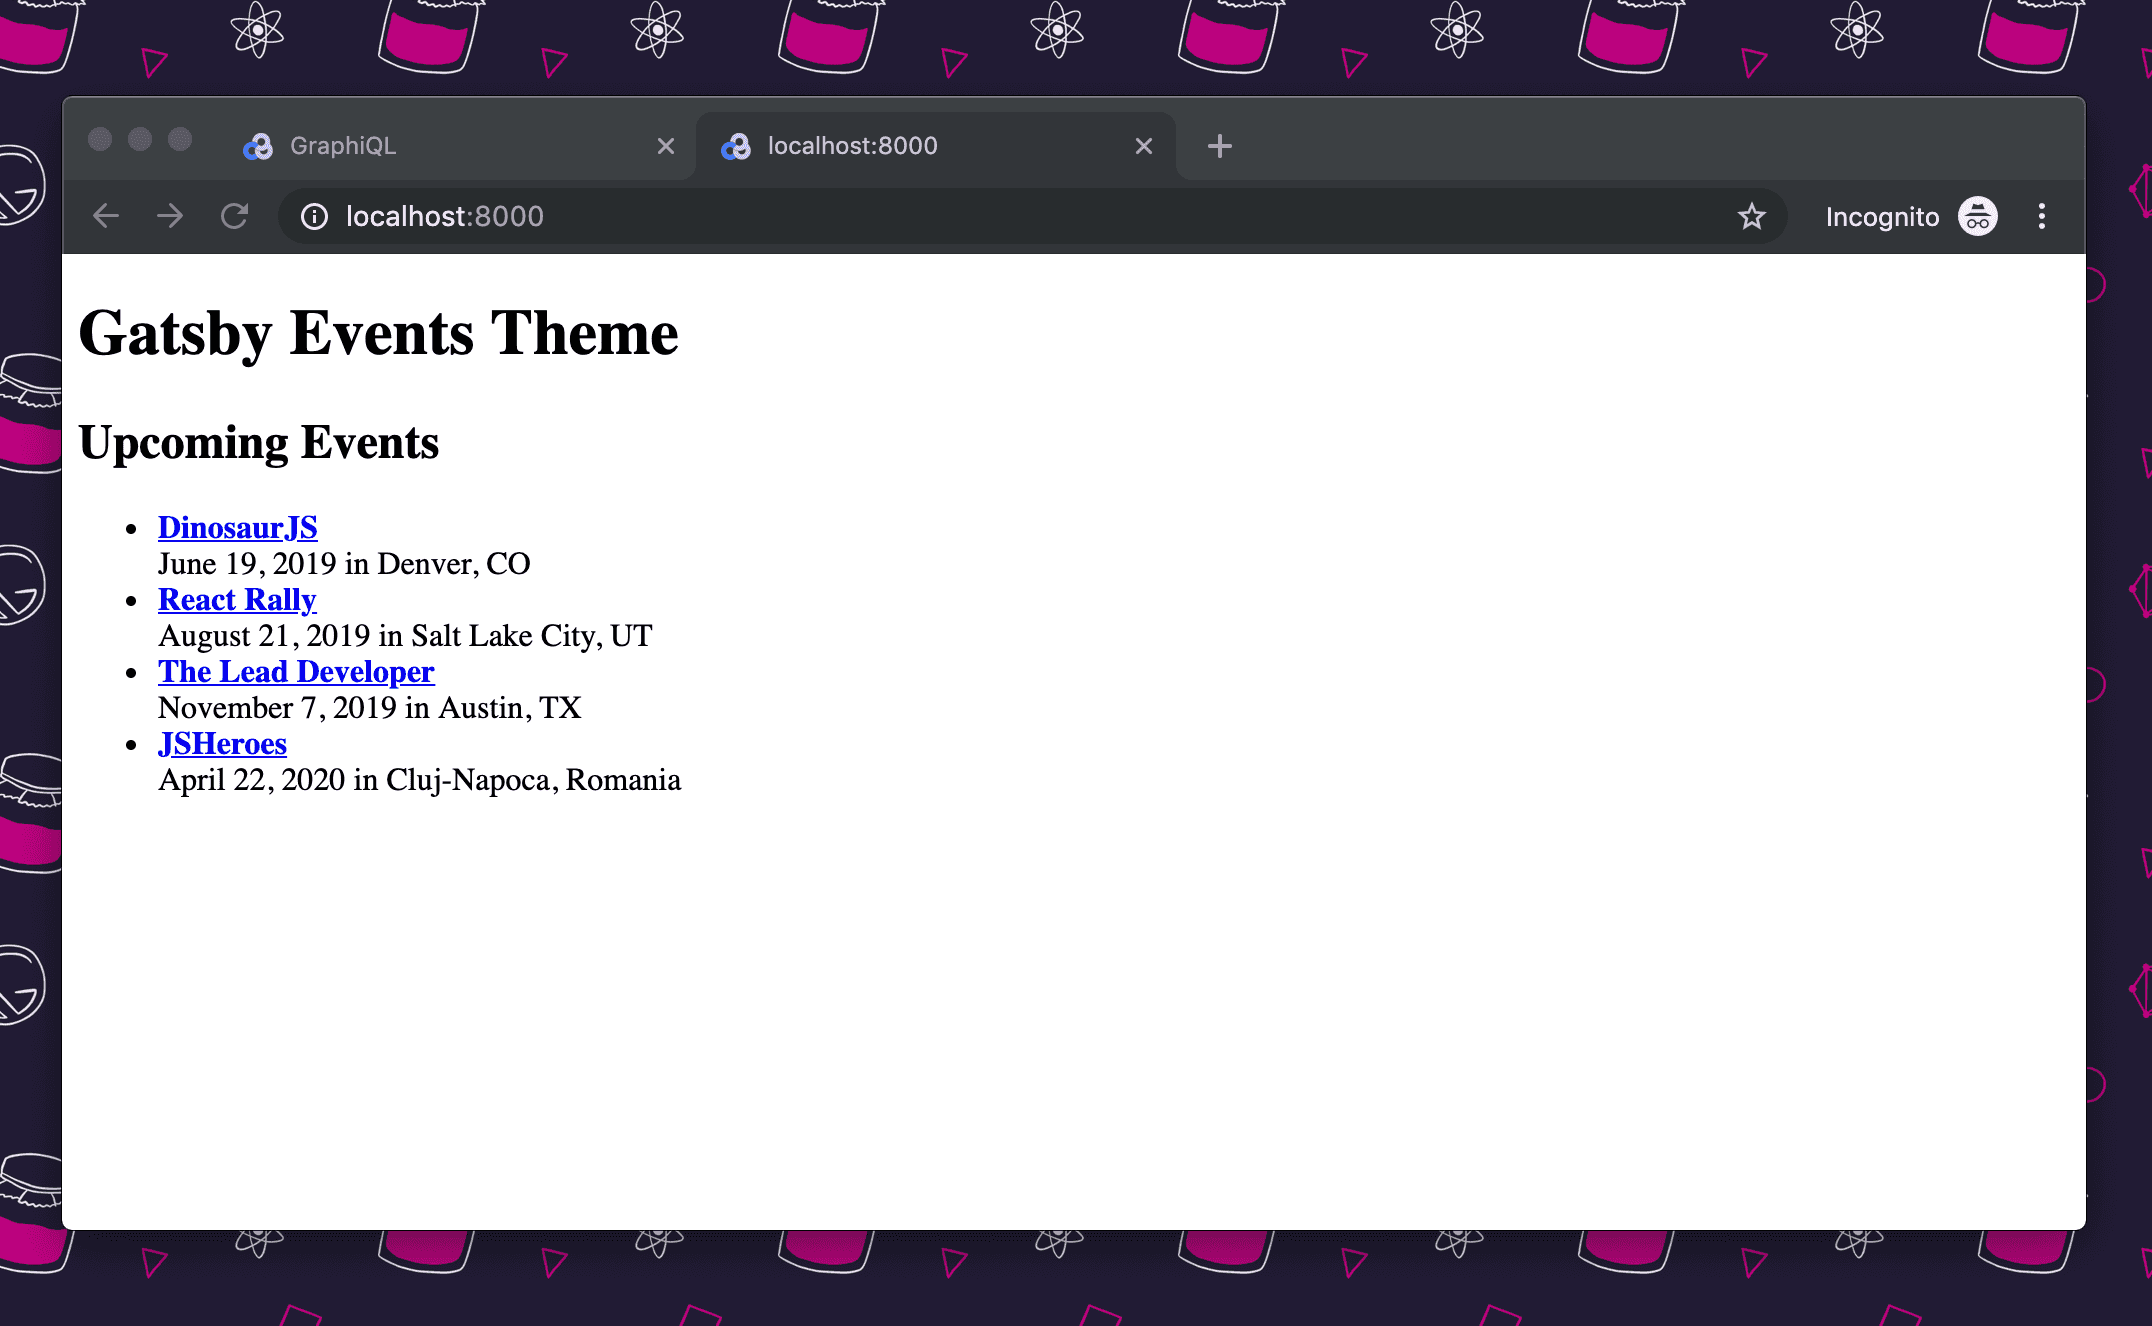
- You’ve created a header for “Upcoming Events”
- You’ve mapped over all of the “event” records, displaying:
- The event name (which links to the event page)
- The date of the event
- The location of the event
Checking again, you should see the new markup:
Display and query data by id with context and static queries
Similar to EventList, you’ll need to create a React component template for an individual Event page.
Add a page query
First, you’ll create a page query to query for individual events by id.
Modify the event template to access event data
There’s some wishful programming here again — the <Event> component doesn’t exist yet. Create that component in gatsby-theme-events/src/components/event.js:
To start off, as before, run JSON.stringify on the props data getting passed to the component to make sure you’re getting the data you expect:
Data is logging on the individual event pages. As before, now update the component to use markup, rather than displaying the raw data:
Now, the individual event page reflects the updated markup:
Style and format dates in React
Now you’ll refactor this component with some business logic to display the event dates in a way that’s more human-readable.
- If the event is one-day: June 30 2019
- If the event is multi-day: July 4-6, 2019
- If the event spans different months: July 30 - August 2 2019
💡 This tutorial won’t go into detail on the date refactor as written. For more detail, refer to the .
Configure a theme to take options
In a Gatsby theme, you can pass options both to gatsby-config.js, and to gatsby-node.js.
Update the gatsby-theme-events/gatsby-config.js to accept options:
The contentPath will default to “data”, and the basePath will default to the root, ”/“.
In gatsby-node.js, the options that were added to the gatsby-config.js function are provided as a second argument to Gatsby’s API hooks.
Update the contentPath to use the option set in gatsby-config.js:
💡 Up till now, you’ve mostly worked in the
gatsby-theme-eventsspace. Because you’ve converted the theme to use a function export, you can no longer run the theme on its own. The function export ingatsby-config.jsis only supported for themes. From now on you’ll be runningsite— the Gatsby site consuminggatsby-theme-events, instead. Gatsby sites still require the object export ingatsby-config.js.
Test out this new options-setting by making some adjustments to site.
Set up site/gatsby-config.js
Create a gatsby-config.js file inside site:
- is set to “events”. So, rather than looking in the default “data” directory for content, the site will be looking for content in an “events” directory.
basePathis set to “events”. So, rather than creating the events listing at the root ("/"), you should see an events listing page at/events.
To test this, run the site:
Once this is running, you’ll observe two things:
- An “events” directory has automatically been generated for you in
site/events. - If you hit
http://localhost:8000/404(or any other route that doesn’t exist), you’ll see that the site has created an/eventspage. However, you don’t have any event data in the site. Copy theevents.ymlfile fromgatsby-theme-events/dataintosite/events. Then, restart the dev server:
The events listing page will now be accessible at http://localhost:8000/events. Hitting will return a 404.
Make themes extendable with gatsby-plugin-theme-ui
You can make your theme styles extendable using the gatsby-plugin-theme-ui package.
Install dependencies:
Then, add the gatsby-plugin-theme-ui plugin to the gatsby-theme-events/gatsby-config.js file:
gatsby-plugin-theme-ui takes a global theme context object and makes it available to all themes using gatsby-plugin-theme-ui.
To use it, create a theme.js file in gatsby-theme-events/src:
gatsby-plugin-theme-ui uses , which is part of a System UI network of tools, all of which follow the .
To use the theme you’ve defined, you’ll need to use component shadowing to override the default theme in gatsby-plugin-theme-ui.
You’ll use component shadowing to activate the custom theme defined in the previous step.
Create a new file at gatsby-theme-events/src/gatsby-plugin-theme-ui/index.js:
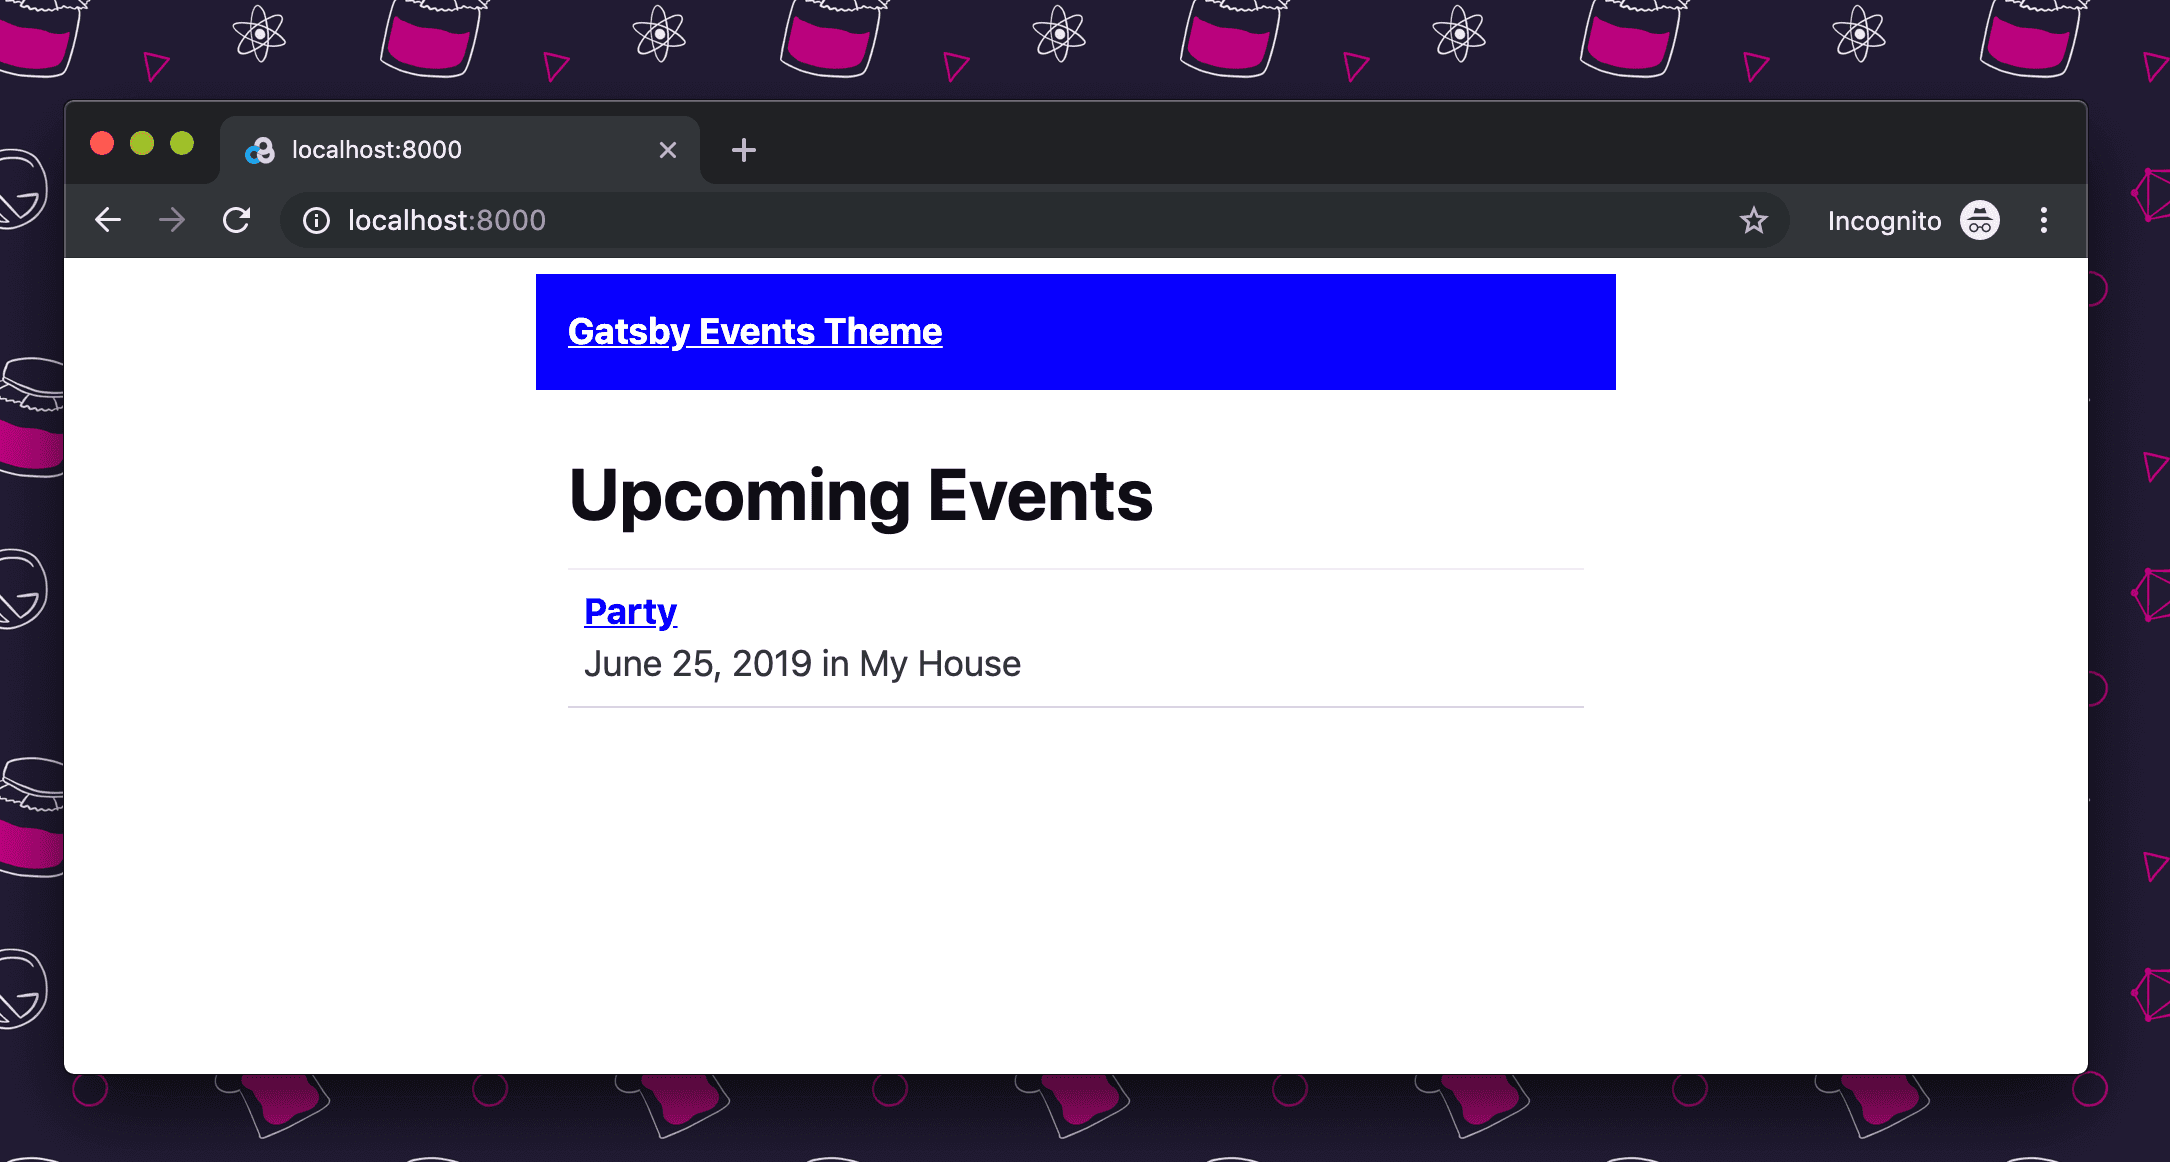
First, import the Layout, Header, Main, and Container components from Theme UI.
Next, refactor the layout.js component to use the Theme UI components:
Run the site to see the theme changes that are starting to take effect:
To continue applying theme styles, you can use the Style import from Theme UI. For example, in the event-list.js component, change the <h1>, <ul> and <li> elements to reference their themed styles:
By replacing the h1 with Styled.h1, ul with Styled.ul, and li with Styled.li, the theme styles for those elements have been applied:
Publish a theme to npm
By publishing your theme to npm, you make it available to pull in as a dependency for any of your projects, and for anyone in the community to use, too.
💡 Please note that publishing your theme is only required if you want to install it on other sites or share it with the community. If you’re only building this theme as a learning exercise, you can skip this step.
It’s important to namespace your theme. It helps differentiate between published packages, and avoid naming collisions.
Make sure you’re logged in to npm
To check whether you’re logged in to npm, run npm whoami:
If you’re logged in, it will return your npm username.
If you’re not logged in, it will return an error.
To log in, run npm adduser:
You’ll be prompted for your npm username and password, and an email. (If you don’t have one, create one now).
Now that your theme is namespaced, and you’re logged in to npm, you’re ready to publish.
Publish your theme
Change directories into the gatsby-theme-events directory and run npm publish:
💡 Because it’s namespaced, you’ll need to include public access.
Now it’s published! After publishing, you’ll be able to find your theme on npm at npmjs.com/{yourpackagename}
Consume a theme in a Gatsby application
Now it’s time to test the theme you’ve created!
Set up a new Gatsby site
Make a new directory called theme-test, and set up the project:
💡 Where it says
@jlengstorf/gatsby-theme-events, use the theme you just published instead! Or if you didn’t want to actually publish your test theme, go ahead and use@jlengstorf/gatsby-theme-events.
Configure the theme
Open up the code for this new project.
Create a new gatsby-config.js file in the root:
Install the Gatsby CLI
Run:
Run the site
Making sure you’re in your /theme-test directory, run gatsby develop to start the site.
Add some data
In your project, create a directory, data. Inside data, create a new file, events.yml:
Save, and you’ll see the new event data in your project:
Use component shadowing to override theme components
“Component shadowing” in Gatsby themes allow you to override or modify components in the theme. Use your new “theme-test” project to experiment with this.
Override theme colors
In the root of theme-test, add a src folder. Inside src, add a folder titled gatsby-plugin-theme-ui.
Inside gatsby-plugin-theme-ui, create a new file, index.js.
Your file tree will look like this:
Inside the new index.js file, add the following:
You’ll be using lodash.merge, so install that now:
Restart the dev server for theme-test. Your local site should now have a blue header instead of a purple one:
A few notable things are happening in this index.js file:
- The
themeimport from@jlengstorf/gatsby-theme-eventsis the base UI theme from@jlengstorf/gatsby-theme-events. - The new object exported from
index.jsuseslodash.mergeto deeply merge the base UI theme with the theme overrides of your choice. In this case, changing the primary color to blue.
Override an entire component
Inside src, create a folder with the same title as your theme.
Anything inside theme-test/src/@jlengstorf/gatsby-theme-events will “shadow” the components in @jlengstorf/gatsby-theme-events.
For example, create a new file to override the layout component: theme-test/src/@jlengstorf/gatsby-theme-events/components/layout.js.
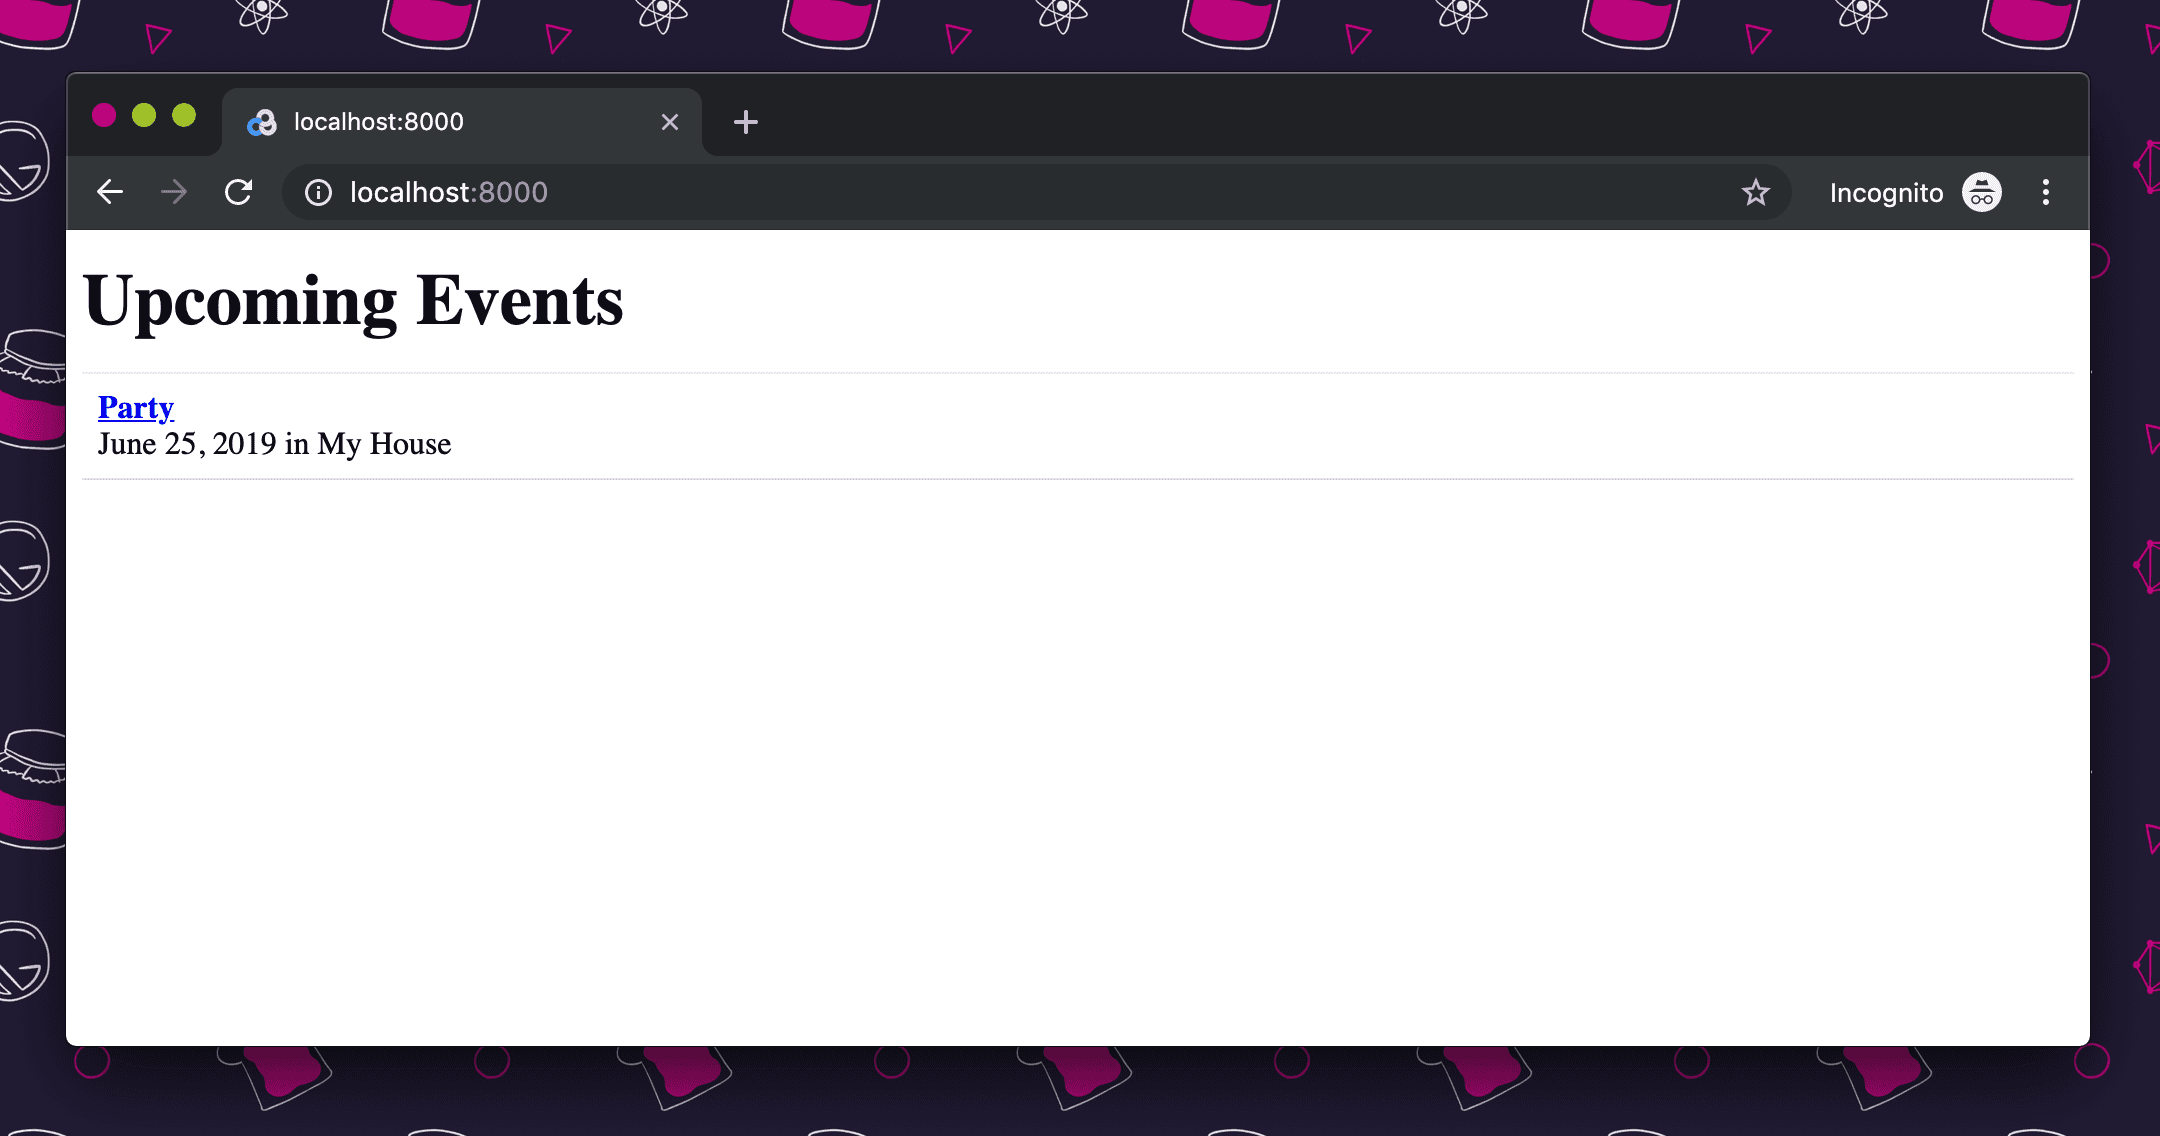
If you restart the development server, you’ll see all of the styles and structure from the theme have been stripped away, because the component has been completely overridden:
Conclusion
Congratulations! You’ve set up, built, and customized your first Gatsby theme!
- Check out the Gatsby themes docs to keep learning.
- Have an idea for a theme you’d like to build? Get a headstart on a local theme development workspace using the .
- Have you built a Gatsby starter before? Perhaps convert that starter to a theme.
