
附錄二、用 React Native + Firebase 開發跨平台行動應用程式
跨平台()一直以來是軟體工程的聖杯。過去一段時間市場上有許多嘗試跨平台開發原生行動裝置(Native Mobile App)的解決方案,嘗試運用 HTML、CSS 和 JavaScript 等網頁前端技術達到跨平台的效果,例如:運用 、Ionic 和 等 Mobile UI 框架(Framework)結合 JavaScript 框架並搭配 Cordova/PhoneGap 進行跨平台行動裝置開發。然而,因為這些解決方案通常都是運行在 WebView 之上,導致效能和體驗要真正趨近於原生應用程式(Native App)還有一段路要走。
不過,隨著 Facebook 工程團隊開發的 橫空出世,想嘗試跨平台解決方案的開發者又有了新的選擇。
React Native 特色
在正式開始開發 React Native App 之前我們先來介紹一下 React Native 的主要特色:
- 使用 JavaScript(ES6+)和 React 打造跨平台原生應用程式(Learn once, write anywhere)
- 使用 Native Components,更貼近原生使用者體驗
- 在 JavaScript 和 Native 之間的操作為非同步(Asynchronous)執行,並可用 Chrome 開發者工具除錯,支援
Hot Reloading - 使用 進行排版和布局
- 良好的可擴展性(Extensibility),容易整合 Web 生態系標準(XMLHttpRequest、 navigator.geolocation 等)或是原生的元件或函式庫(Objective-C、Java 或 Swift)
- Facebook 已使用 React Native 於自家 Production App 且將持續維護,另外也有持續蓬勃發展的技術社群
- 讓 Web 開發者可以使用熟悉的技術切入 Native App 開發
- 2015/3 釋出 iOS 版本,2015/9 釋出 Android 版本
- 目前更新速度快,平均每兩週發佈新的版本。社群也還持續在尋找最佳實踐,關於版本進展可以參考這個文件
- 支援的作業系統為 >= Android 4.1 (API 16) 和 >= iOS 7.0
在了解了 React Native 特色後,我們準備開始開發我們的 React Native 應用程式!由於我們的範例可以讓程式跨平台共用,所以你可以使用 iOS 和 Android 平台運行。不過若是想在 iOS 平台開發需要先準備 Mac OS 和安裝 開發工具,若是你準備使用 Android 平台的話建議先行安裝 Android Studio 和 。在我們範例我們使用筆者使用的 MacO OS 作業系統並使用 Android 平台為主要範例,若有其他作業系統需求的讀者可以參考 官方安裝說明。
一開始請先安裝 、Watchman 和 React Native command line 工具:
// 安裝 React Native command line 工具$ npm install -g react-native-cli
由於我們是要開發 Android 平台,所以必須安裝:
- 安裝 JDK
- 安裝 Android SDK
- 設定一些環境變數
以上可以透過 官網和 官方安裝說明 步驟完成。
現在,我們先透過一個簡單的 HelloWorldApp,讓大家感受一下 React Native 專案如何開發。
首先,我們先初始化一個 React Native Project:
$ react-native init HelloWorldApp
初始的資料夾結構長相:
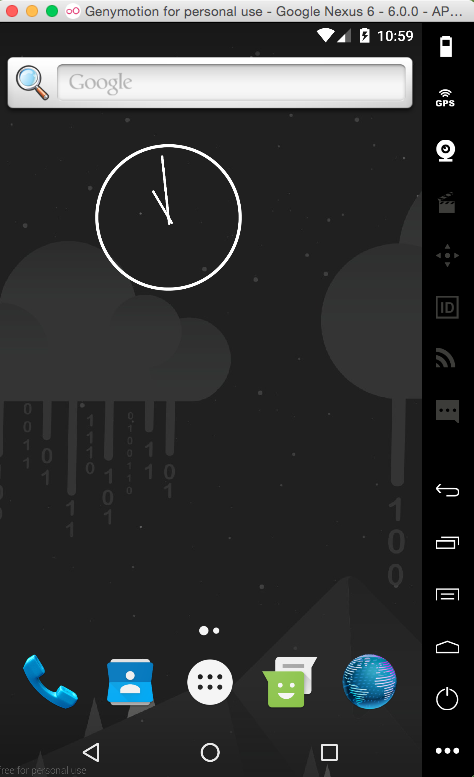
接下來請先安裝註冊 ,Genymotion 是一個透過電腦模擬 Android 系統的好用開發模擬器環境。安裝完後可以打開並選擇欲使用的螢幕大小和 API 版本的 Android 系統。建立裝置後就可以啟動我們的裝置:
若你是使用 Mac OS 作業系統的話可以執行 run-ios,若是使用 Android 平台則使用 run-android 啟動你的 App。在這邊我們先使用 Android 平台進行開發(若你希望實機測試,請將電腦接上你的 Android 手機,記得確保 menu 中的 ip 位置要和電腦網路 相同。若是遇到連不到程式 server 且手機為 Android 5.0+ 系統,可以執行 adb reverse tcp:8081 tcp:8081,詳細情形可以參考官網說明):
$ react-native run-android
如果一切順利的話就可以在模擬器中看到初始畫面:
接著打開 index.android.js 就可以看到以下程式碼:
import React, { Component } from 'react';import {AppRegistry,StyleSheet,Text,View} from 'react-native';// 元件式的開發方式和 React 如出一轍,但要注意的是在 React Native 中我們不使用 HTML 元素而是使用 React Native 元件進行開發,這也符合 Learn once, write anywhere 的原則。class HelloWorldApp extends Component {render() {return (<View style={styles.container}><Text style={styles.welcome}>Welcome to React Native!</Text><Text style={styles.instructions}>To get started, edit index.android.js</Text><Text style={styles.instructions}>Double tap R on your keyboard to reload,{'\n'}Shake or press menu button for dev menu</Text></View>);}}// 在 React Native 中 styles 是使用 JavaScript 形式來撰寫,與一般 CSS 比較不同的是他使用駝峰式的屬性命名:const styles = StyleSheet.create({container: {flex: 1,justifyContent: 'center',alignItems: 'center',backgroundColor: '#F5FCFF',},welcome: {fontSize: 20,textAlign: 'center',margin: 10,},instructions: {textAlign: 'center',color: '#333333',marginBottom: 5,},});// 告訴 React Native App 你的進入點:AppRegistry.registerComponent('HelloWorldApp', () => HelloWorldApp);
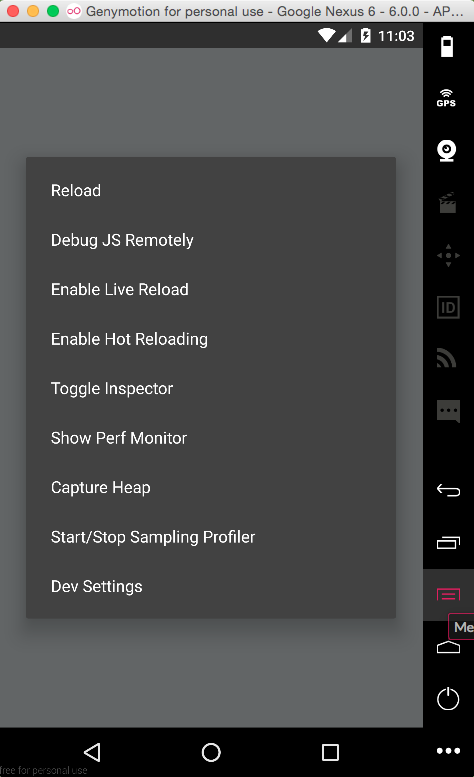
由於 React Native 有支援 Hot Reloading,若我們更改了檔案內容,我們可以使用打開模擬器 Menu 重新刷新頁面,此時就可以在看到原本的 Welcome to React Native! 文字已經改成 Welcome to React Native Rock!!!!
嗯,有沒有感覺在開發網頁的感覺?
動手實作
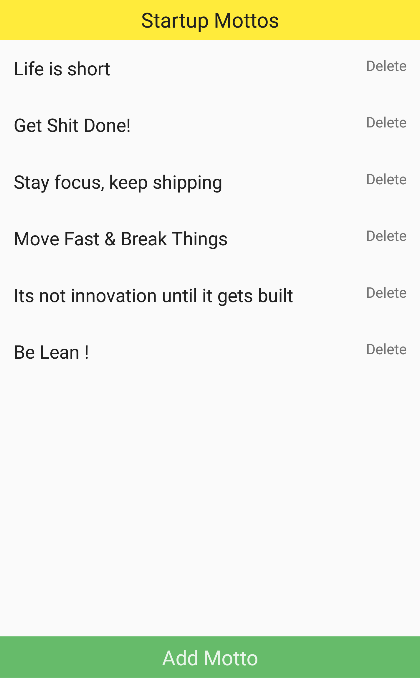
相信看到這裡讀者們一定等不及想大展身手,使用 React Native 開發你第一個 App。俗話說學習一項新技術最好的方式就是做一個 TodoApp。所以,接下來的文章,筆者將帶大家使用 React Native 結合 Redux/ImmutableJS 和 Firebase 開發一個記錄和刪除名言佳句(Mottos)的 Mobile App!
相關套件安裝:
$ npm install --save redux react-redux immutable redux-immutable redux-actions uuid firebase
$ npm install --save-dev babel-core babel-eslint babel-loader babel-preset-es2015 babel-preset-react babel-preset-react-native eslint-plugin-react-native eslint eslint-config-airbnb eslint-loader eslint-plugin-import eslint-plugin-jsx-a11y eslint-plugin-react redux-logger
安裝完相關工具後我們可以初始化我們專案:
// 注意專案不能使用 - 或 _ 命名$ react-native init ReactNativeFirebaseMotto$ cd ReactNativeFirebaseMotto
我們先準備一下我們資料夾架構,將它設計成:
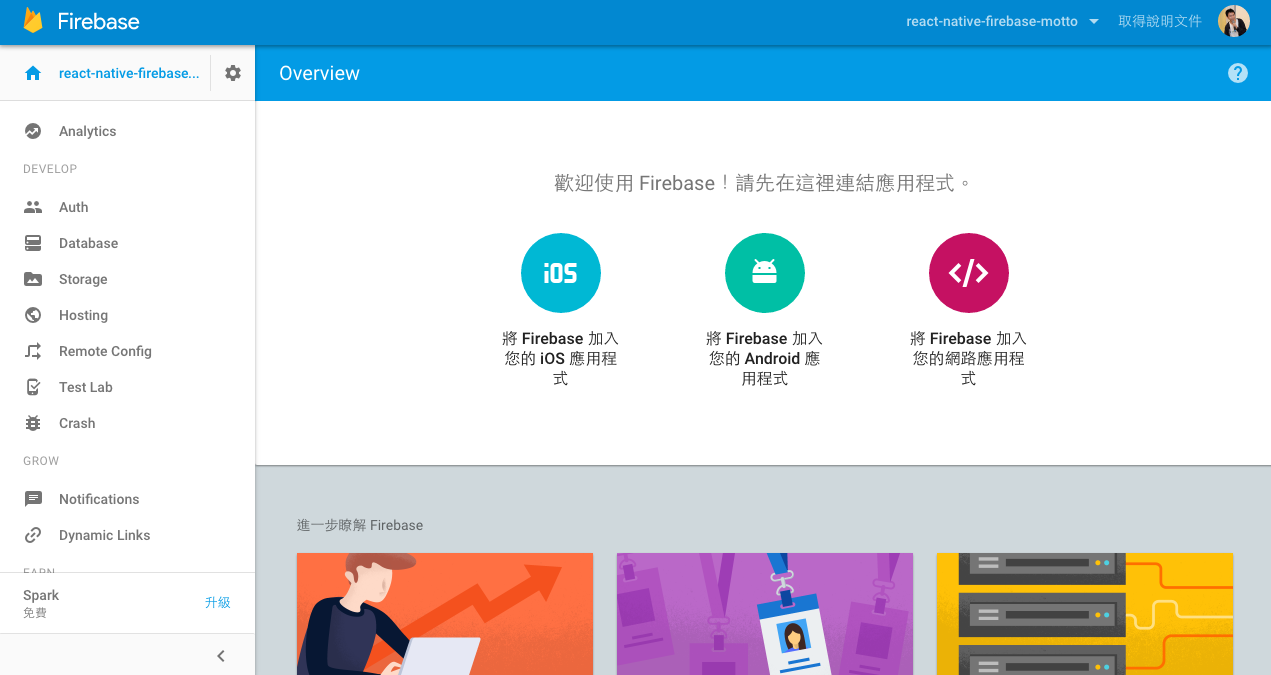
在這個專案中我們會使用到 這個 Back-End as Service的服務,也就是說我們不用自己建立後端程式資料庫,只要使用 Firebase 所提供的 API 就好像有了一個 NoSQL 資料庫一樣,當然 Firebase 不單只有提供資料儲存的功能,但限於篇幅我們這邊將只介紹資料儲存的功能。
首先我們進到 Firebase 首頁

登入後點選建立專案,依照自己想取的專案名稱命名
選擇將 Firebase 加入你的網路應用程式的按鈕可以取得 App ID 的 config 資料,待會我們將會使用到
點選左邊選單中的 Database 並點選 Realtime Database Tab 中的規則
設定改為,在範例中為求簡單,我們先不用驗證方式即可操作:
{"rules": {".read": true,".write": true}}
Firebase 在使用上有許多優點,其中一個使用 Back-End As Service 的好處是你可以專注在應用程式的開發便免花過多時間處理後端基礎建設的部份,更可以讓 Back-End 共用在不同的 client side 中。此外 Firebase 在和 React 整合上也十分容易,你可以想成 Firebase 負責資料的儲存,透過 API 和 React 元件互動,Redux 負責接收管理 client state,若是監聽到 Firebase 後端資料更新後同步更新 state 並重新 render 頁面。
在 React Native 中是使用 Flexbox 進行排版,若讀者對於 Flexbox 尚不熟悉,建議可以參考這篇文章,若有需要遊戲化的學習工具,也非常推薦這兩個教學小遊戲:、FLEXBOX FROGGY。
事實上我們可以將 Flexbox 視為一個箱子,最外層是 flex containers、內層包的是 flex items,在屬性上也有分是針對flex containers 還是針對是 flex items 設計的。在方向性上由左而右是 main axis,而上到下是 cross axis。

在 Flexbox 有許多屬性值,其中最重要的當數 justifyContent 和 alignItems 以及 flexDirection(注意 React Native Style 都是駝峰式寫法),所以我們這邊主要介紹這三個屬性:
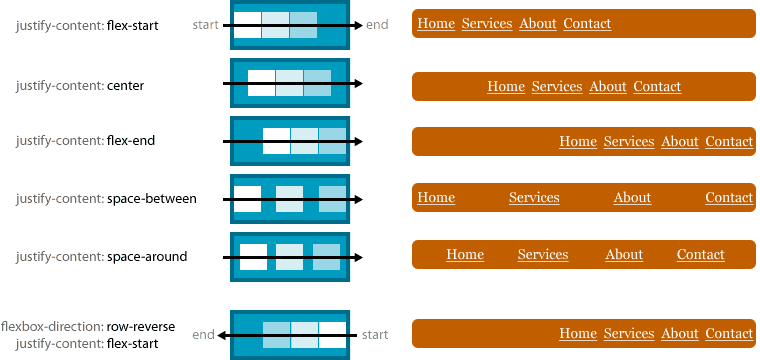
Flex Direction 負責決定整個 flex containers 的方向,預設為 row 也可以改為 column 、 row-reverse 和 column-reverse。
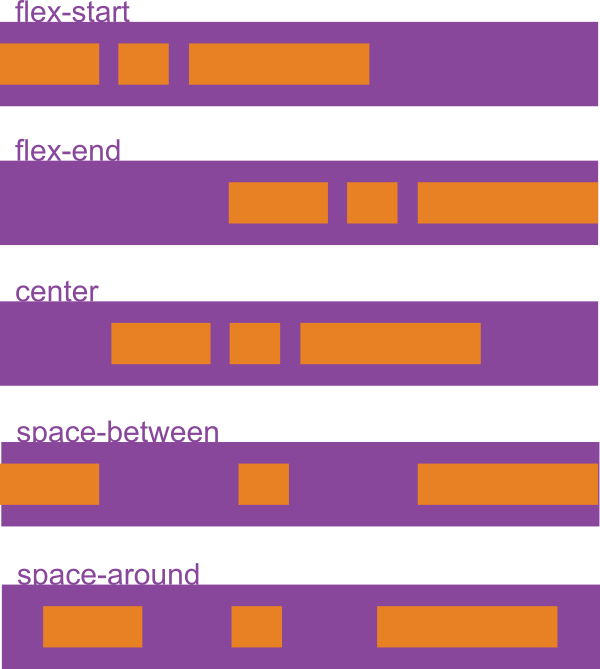
Justify Content 負責決定整個 flex containers 內的 items 的水平擺設,主要屬性值有:flex-start、flex-end、center、space-between、space-around。
Align Items 負責決定整個 flex containers 內的 items 的垂直擺設,主要屬性值有:flex-start、flex-end、center、stretch、baseline。
有了前面的準備,現在我們終於要開始進入核心的應用程式開發了!
首先我們先設定好整個 App 的進入檔 index.android.js,在這個檔案中我們設定了初始化的設定和主要元件 <Main />:
/*** Sample React Native App* https://github.com/facebook/react-native* @flow*/import React, { Component } from 'react';import {AppRegistry,Text,View} from 'react-native';import Main from './src/components/Main';class ReactNativeFirebaseMotto extends Component {render() {return (<Main />);}}AppRegistry.registerComponent('ReactNativeFirebaseMotto', () => ReactNativeFirebaseMotto);
在 src/components/Main/Main.js 中我們設定好整個 Component 的布局和並將 Firebase 引入並初始化,將操作 Firebase 資料庫的參考往下傳,根節點我們命名為 items,所以之後所有新增的 motto 都會在這個根節點之下並擁有特定的 key 值。在 Main 我們同樣規劃了整個布局,包括:<ToolBar />、<MottoListContainer />、<ActionButtonContainer />、<InputModalContainer />。
import React from 'react';import ReactNative from 'react-native';import { Provider } from 'react-redux';import ToolBar from '../ToolBar';import MottoListContainer from '../../containers/MottoListContainer';import ActionButtonContainer from '../../containers/ActionButtonContainer';import InputModalContainer from '../../containers/InputModalContainer';import ListItem from '../ListItem';import * as firebase from 'firebase';// 將 Firebase 的 config 值引入import { firebaseConfig } from '../../constants/config';// 引用 Redux storeimport store from '../../store';const { View, Text } = ReactNative;// Initialize Firebaseconst firebaseApp = firebase.initializeApp(firebaseConfig);// Create a reference with .ref() instead of new Firebase(url)const rootRef = firebaseApp.database().ref();const itemsRef = rootRef.child('items');// 將 Redux 的 store 透過 Provider 往下傳const Main = () => (<Provider store={store}><View><ToolBar style={styles.toolBar} /><MottoListContainer itemsRef={itemsRef} /><ActionButtonContainer /><InputModalContainer itemsRef={itemsRef} /></View></Provider>);export default Main;
設定完了基本的布局方式後我們來設定 Actions 和其使用的常數,src/actions/mottoActions.js:
我們在 constants 資料夾中也設定了我們整個 data 的資料結構,以下是 src/constants/models.js:
import Immutable from 'immutable';export const MottoState = Immutable.fromJS({mottos: [],motto: {id : '',text: '',updatedAt: '',}});export const UiState = Immutable.fromJS({isModalVisible: false,});
還記得我們提到的 Firebase config 嗎?這邊我們把相關的設定檔放在src/configs/config.js中:
export const firebaseConfig = {apiKey: "apiKey",authDomain: "authDomain",databaseURL: "databaseURL",storageBucket: "storageBucket",};
在我們應用程式中同樣使用了 redux 和 。在這個範例中我們設計了:GET_MOTTOS、CREATE_MOTTO、SET_IN_MOTTO 三個操作 motto 的 action,分別代表從 Firebase 取出資料、新增資料和 set 資料。以下是 src/actions/mottoActions.js:
import { createAction } from 'redux-actions';import {GET_MOTTOS,CREATE_MOTTO,SET_IN_MOTTO,} from '../constants/actionTypes';export const getMottos = createAction('GET_MOTTOS');export const createMotto = createAction('CREATE_MOTTO');export const setInMotto = createAction('SET_IN_MOTTO');
import { createAction } from 'redux-actions';import {TOGGLE_MODAL,} from '../constants/actionTypes';
以下是 src/actions/index.js,用來匯出我們的 actions:
export * from './uiActions';export * from './mottoActions';
設定完我們的 actions 後我們來設定 reducers,在這邊我們同樣使用 redux-actions 整合 ImmutableJS,
import { handleActions } from 'redux-actions';// 引入 initialStateimport {MottoState} from '../../constants/models';import {GET_MOTTOS,CREATE_MOTTO,SET_IN_MOTTO,} from '../../constants/actionTypes';// 透過 set 和 seIn 可以產生 newStateconst mottoReducers = handleActions({GET_MOTTOS: (state, { payload }) => (state.set('mottos',payload.mottos)),CREATE_MOTTO: (state) => (state.set('mottos',state.get('mottos').push(state.get('motto')))),SET_IN_MOTTO: (state, { payload }) => (state.setIn(payload.path,payload.value))}, MottoState);export default mottoReducers;
以下是 src/reducers/uiState.js:
import { handleActions } from 'redux-actions';import {UiState,} from '../../constants/models';import {TOGGLE_MODAL,} from '../../constants/actionTypes';// modal 的顯示與否const uiReducers = handleActions({TOGGLE_MODAL: (state) => (state.set('isModalVisible',!state.get('isModalVisible'))),}, UiState);export default uiReducers;
以下是 src/reducers/index.js,將所有 reducers combine 在一起:
import { combineReducers } from 'redux-immutable';import ui from './ui/uiReducers';import motto from './data/mottoReducers';const rootReducer = combineReducers({ui,motto,});export default rootReducer;
透過 src/store/configureStore.js將 reducers 和 initialState 以及要使用的 middleware 整合成 store:
import { createStore, applyMiddleware } from 'redux';import createLogger from 'redux-logger';import Immutable from 'immutable';import rootReducer from '../reducers';const initialState = Immutable.Map();export default createStore(rootReducer,initialState,applyMiddleware(createLogger({ stateTransformer: state => state.toJS() })));
設定完資料層的架構後,我們又重新回到 View 的部份,我們開始依序設定我們的 Component 和 Container。首先,我們先設計我們的標題列 ToolBar,以下是 src/components/ToolBar/ToolBar.js:
import React from 'react';import ReactNative from 'react-native';import styles from './toolBarStyles';const { View, Text } = ReactNative;const ToolBar = () => (<View style={styles.toolBarContainer}><Text style={styles.toolBarText}>Startup Mottos</Text></View>);export default ToolBar;
以下是 src/components/ToolBar/toolBarStyles.js,將底色設定為黃色,文字置中:
以下是 src/components/MottoList/MottoList.js,這個 Component 中稍微複雜一些,主要是使用到了 React Native 中的 ListView Component 將資料陣列傳進 dataSource,透過 renderRow 把一個個 row 給 render 出來,過程中我們透過 !Immutable.is(r1.get('id'), r2.get('id')) 去判斷整個 ListView 畫面是否需要 loading 新的 item 進來,這樣就可以提高整個 ListView 的效能。
import React, { Component } from 'react';import ReactNative from 'react-native';import Immutable from 'immutable';import ListItem from '../ListItem';import styles from './mottoStyles';const { View, Text, ListView } = ReactNative;class MottoList extends Component {constructor(props) {super(props);this.renderListItem = this.renderListItem.bind(this);this.listenForItems = this.listenForItems.bind(this);this.ds = new ListView.DataSource({rowHasChanged: (r1, r2) => !Immutable.is(r1.get('id'), r2.get('id')),})}renderListItem(item) {return (<ListItem item={item} onDeleteMotto={this.props.onDeleteMotto} itemsRef={this.props.itemsRef} />);}listenForItems(itemsRef) {itemsRef.on('value', (snap) => {if(snap.val() === null) {this.props.onGetMottos(Immutable.fromJS([]));} else {this.props.onGetMottos(Immutable.fromJS(snap.val()));}});}componentDidMount() {this.listenForItems(this.props.itemsRef);}render() {return (<View><ListViewstyle={styles.listView}dataSource={this.ds.cloneWithRows(this.props.mottos.toArray())}renderRow={this.renderListItem}enableEmptySections={true}/></View>);}}export default MottoList;
以下是 src/components/MottoList/mottoListStyles.js,我們使用到了 Dimensions,可以根據螢幕的高度來設定整個 ListView 高度:
import { StyleSheet, Dimensions } from 'react-native';const { height } = Dimensions.get('window');export default StyleSheet.create({listView: {flex: 1,flexDirection: 'column',height: height - 105,},});
以下是 src/components/ListItem/ListItem.js,我們從 props 收到了上層傳進來的 motto item,顯示出 motto 文字內容。當我們點擊 <TouchableHighlight> 時就會刪除該 motto。
import React from 'react';import ReactNative from 'react-native';import styles from './listItemStyles';const { View, Text, TouchableHighlight } = ReactNative;const ListItem = (props) => {return (<View style={styles.listItemContainer}><Text style={styles.listItemText}>{props.item.get('text')}</Text><TouchableHighlight onPress={props.onDeleteMotto(props.item.get('id'), props.itemsRef)}><Text>Delete</Text></TouchableHighlight></View>};export default ListItem;
以下是 src/components/ListItem/listItemStyles.js:
import { StyleSheet } from 'react-native';export default StyleSheet.create({listItemContainer: {flex: 1,flexDirection: 'row',padding: 10,margin: 5,},listItemText: {flex: 10,fontSize: 18,color: '#212121',}});
以下是 src/components/ActionButton/ActionButton.js,當點擊了按鈕則會觸發 onToggleModal 方法,出現新增 motto 的 modal:
import React from 'react';import ReactNative from 'react-native';import styles from './actionButtonStyles';const { View, Text, Modal, TextInput, TouchableHighlight } = ReactNative;<TouchableHighlight onPress={props.onToggleModal}><View style={styles.buttonContainer}><Text style={styles.buttonText}>Add Motto</Text></View></TouchableHighlight>);export default ActionButton;
以下是 src/components/ActionButton/actionButtonStyles.js:
import { StyleSheet } from 'react-native';export default StyleSheet.create({buttonContainer: {height: 40,justifyContent: 'center',alignItems: 'center',flexDirection: 'column',backgroundColor: '#66bb6a',},buttonText: {fontSize: 20,color: '#e8f5e9'}});
以下是 src/components/InputModal/InputModal.js,其主要負責 Modal Component 的設計,當輸入內容會觸發 onChangeMottoText 發出 action,注意的是當按下送出鍵,同時會把 Firebase 的參考 itemsRef 送入 onCreateMotto 中,方便透過 API 去即時新增到 Firebase Database,並更新 client state 和重新渲染了 View:
import React from 'react';import ReactNative from 'react-native';import styles from './inputModelStyles';const { View, Text, Modal, TextInput, TouchableHighlight } = ReactNative;const InputModal = (props) => (<View><ModalanimationType={"slide"}transparent={false}visible={props.isModalVisible}onRequestClose={props.onToggleModal}><View><View><Text style={styles.modalHeader}>Please Keyin your Motto!</Text><TextInputonChangeText={props.onChangeMottoText}/><View style={styles.buttonContainer}><TouchableHighlightonPress={props.onToggleModal}style={[styles.cancelButton]}><Textstyle={styles.buttonText}>Cancel</Text></TouchableHighlight><TouchableHighlightonPress={props.onCreateMotto(props.itemsRef)}style={[styles.submitButton]}><Textstyle={styles.buttonText}>Submit</Text></TouchableHighlight></View></View></View></Modal></View>);export default InputModal;
以下是 src/components/InputModal/inputModalStyles.js:
import { StyleSheet } from 'react-native';export default StyleSheet.create({modalHeader: {flex: 1,height: 30,padding: 10,flexDirection: 'row',backgroundColor: '#ffc107',fontSize: 20,},buttonContainer: {flex: 1,flexDirection: 'row',},button: {borderRadius: 5,},cancelButton: {flex: 1,height: 40,alignItems: 'center',justifyContent: 'center',backgroundColor: '#eceff1',margin: 5,},submitButton: {flex: 1,height: 40,alignItems: 'center',justifyContent: 'center',backgroundColor: '#4fc3f7',margin: 5,},buttonText: {fontSize: 20,}});
設定完了 Component,我們來探討一下 Container 的部份。以下是 src/containers/ActionButtonContainer/ActionButtonContainer.js:
import { connect } from 'react-redux';import ActionButton from '../../components/ActionButton';import {toggleModal,} from '../../actions';export default connect((state) => ({}),(dispatch) => ({onToggleModal: () => (dispatch(toggleModal()))}))(ActionButton);
以下是 src/containers/InputModalContainer/InputModalContainer.js:
import { connect } from 'react-redux';import InputModal from '../../components/InputModal';import Immutable from 'immutable';import {toggleModal,setInMotto,createMotto,} from '../../actions';import uuid from 'uuid';export default connect((state) => ({isModalVisible: state.getIn(['ui', 'isModalVisible']),motto: state.getIn(['motto', 'motto']),}),(dispatch) => ({onToggleModal: () => (dispatch(toggleModal())),onChangeMottoText: (text) => (dispatch(setInMotto({ path: ['motto', 'text'], value: text }))),// 新增 motto 是透過 itemsRef 將新增的 motto push 進去,新增後要把本地端的 motto 清空,並關閉 modal:onCreateMotto: (motto) => (itemsRef) => () => {itemsRef.push({ id: uuid.v4(), text: motto.get('text'), updatedAt: Date.now() });dispatch(setInMotto({ path: ['motto'], value: Immutable.fromJS({ id: '', text: '', updatedAt: '' })}));dispatch(toggleModal());}}),(stateToProps, dispatchToProps, ownProps) => {const { motto } = stateToProps;const { onCreateMotto } = dispatchToProps;return Object.assign({}, stateToProps, dispatchToProps, ownProps, {onCreateMotto: onCreateMotto(motto),});},)(InputModal);
以下是 src/containers/MottoListContainer/MottoListContainer.js:
最後我們可以透過啟動模擬器後使用以下指令開啟我們 App!
$ react-native run-android
最後的成果:
同時你可以在 Firebase 後台進行觀察,當呼叫 Firebase API 進行資料更動時,Firebase Realtime Database 就會即時更新:
總結
恭喜你!你已經完成了你的第一個 React Native App,若你希望將你開發的應用程式簽章後上架,請參考,當你完成簽章打包等流程後,我們可以獲得 .apk 檔,這時就可以上架到市集讓隔壁班心儀的女生,啊不是,是廣大的 Android 使用者使用你的 App 啦!當然,由於我們的程式碼可以 100% 共用於 iOS 和 Android 端,所以你也可以同步上架到 Apple Store!
- React Native 官方網站
- Redux 官方文件
- How to Build a Todo App Using React, Redux, and Immutable.js
- React, Redux and Immutable.js: Ingredients for Efficient Web Applications
- redux与immutable实例
- acdlite/redux-actions
- React Native ImmutableJS ListView Example
- js.coach
- React Native 学习笔记
- Authentication in React Native with Firebase
- Building a Simple ToDo App With React Native and Firebase
- Best Practices: Arrays in Firebase
(image via moduscreate、、teamtreehouse、、css-tricks、)
| 回首頁 | | 下一章:附錄三、React 測試入門教學 |
| |

