
这里的代码没有什么新鲜的内容,只不过是建立了一个 comments 的数组来存放一些测试数据的内容,方便我们后续测试。然后把 comments 的数据渲染到页面上,这跟我们之前讲解的章节的内容一样——使用 map 构建一个存放 JSX 的数组。就可以在浏览器看到效果:
修改 Comment.js 让它来负责具体每条评论内容的渲染:
import React, { Component } from 'react'class Comment extends Component {render () {return (<div className='comment'><div className='comment-user'><span>{this.props.comment.username} </span>:</div><p>{this.props.comment.content}</p></div>)}}export default Comment
这个组件可能是我们案例里面最简单的组件了,它只负责每条评论的具体显示。你只需要给它的 props 中传入一个 comment 对象,它就会把该对象中的 username 和 content 渲染到页面上。
马上把 Comment 应用到 CommentList 当中,修改 CommentList.js 代码:
可以看到测试数据显示到了页面上:
之前我们说过 CommentList 的数据应该是由父组件 CommentApp 传进来的,现在我们删除测试数据,改成从 props 获取评论数据:
import React, { Component } from 'react'import Comment from './Comment'class CommentList extends Component {render() {<div><Comment comment={comment} key={i} />)}</div>)}}export default CommentList
这时候可以看到浏览器报错了:
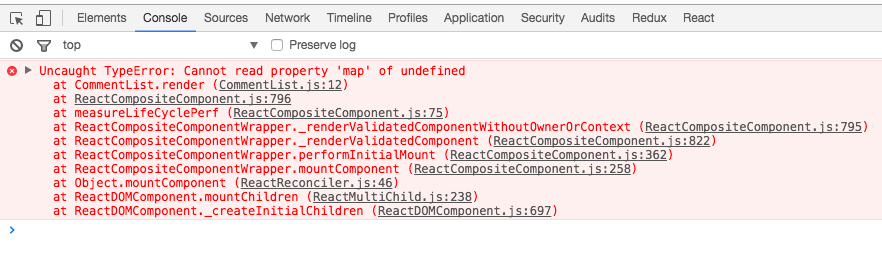
这是因为CommentApp 使用 CommentList 的时候并没有传入 comments。我们给 CommentList 加上 defaultProps 防止 comments 不传入的情况:
这时候代码就不报错了。但是 CommentInput 给 CommentApp 传递的评论数据并没有传递给 CommentList,所以现在发表评论时没有反应的。
我们在 CommentApp 的 state 中初始化一个数组,来保存所有的评论数据,并且通过 props 把它传递给 CommentList。修改 CommentApp.js:
import React, { Component } from 'react'import CommentInput from './CommentInput'import CommentList from './CommentList'class CommentApp extends Component {constructor () {super()this.state = {comments: []}}handleSubmitComment (comment) {console.log(comment)render() {return (<div className='wrapper'><CommentInput onSubmit={this.handleSubmitComment.bind(this)} /><CommentList comments={this.state.comments}/></div>)}}export default CommentApp
现在代码应该是可以按照需求正常运作了,输入用户名和评论内容,然后点击发布:
为了让代码的健壮性更强,给 handleSubmitComment 加入简单的数据检查:
...handleSubmitComment (comment) {if (!comment) returnif (!comment.username) return alert('请输入用户名')if (!comment.content) return alert('请输入评论内容')this.state.comments.push(comment)this.setState({comments: this.state.comments})}...
到这里,我们的第一个实战案例——评论功能已经完成了!完整的案例代码可以在这里 comment-app 找到, 体验。
在这个案例里面,我们除了复习了之前所学过的内容以外还学习了新的知识点。包括:
- 实现功能之前先理解、分析需求,划分组件。并且掌握划分组件的基本原则——可复用性、可维护性。
- 组件之间使用
props通过父元素传递数据的技巧。 当然,在真实的项目当中,这个案例很多地方是可以优化的。包括组件可复用性方面(有没有发现其实CommentInput中有重复的代码?)、应用的状态管理方面。但在这里为了给大家总结和演示,实现到这个程度也就足够了。

