集成RabbitMQ
AMQP是一种使用广泛的独立于语言的消息协议,它的全称是Advanced Message Queuing Protocol,即高级消息队列协议,它定义了一种二进制格式的消息流,任何编程语言都可以实现该协议。实际上,Artemis也支持AMQP,但实际应用最广泛的AMQP服务器是使用编写的RabbitMQ。
我们先从RabbitMQ的官网并安装RabbitMQ,安装和启动RabbitMQ请参考官方文档。要验证启动是否成功,可以访问RabbitMQ的管理后台http://localhost:15672,如能看到登录界面表示RabbitMQ启动成功:
RabbitMQ后台管理的默认用户名和口令均为。
AMQP协议
AMQP协议和前面我们介绍的JMS协议有所不同。在JMS中,有两种类型的消息通道:
- 点对点的Queue,即Producer发送消息到指定的Queue,接收方从Queue收取消息;
- 一对多的Topic,即Producer发送消息到指定的Topic,任意多个在线的接收方均可从Topic获得一份完整的消息副本。
但是AMQP协议比JMS要复杂一点,它只有Queue,没有Topic,并且引入了Exchange的概念。当Producer想要发送消息的时候,它将消息发送给Exchange,由Exchange将消息根据各种规则投递到一个或多个Queue:
如果某个Exchange总是把消息发送到固定的Queue,那么这个消息通道就相当于JMS的Queue。如果某个Exchange把消息发送到多个Queue,那么这个消息通道就相当于JMS的Topic。和JMS的Topic相比,Exchange的投递规则更灵活,比如一个“登录成功”的消息被投递到Queue-1和Queue-2,而“登录失败”的消息则被投递到Queue-3。这些路由规则称之为Binding,通常都在RabbitMQ的管理后台设置。
我们以具体的业务为例子,在RabbitMQ中,首先创建3个Queue,分别用于发送邮件、短信和App通知:
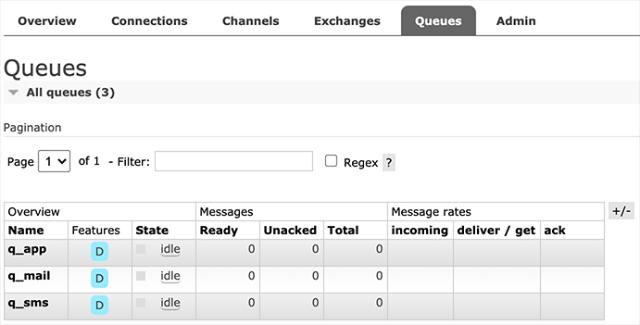
创建Queue时注意到可配置为持久化(Durable)和非持久化(Transient),当Consumer不在线时,持久化的Queue会暂存消息,非持久化的Queue会丢弃消息。
上述Binding的规则就是:凡是发送到registration这个Exchange的消息,均被发送到q_mail和q_sms这两个Queue。
我们再创建一个Direct类型的Exchange,命名为login,并添加如下Binding:
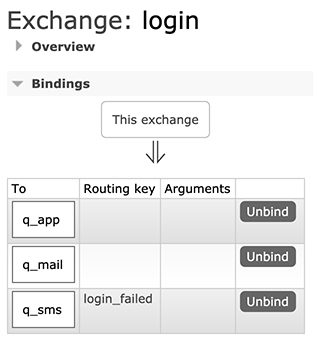
上述Binding的规则稍微复杂一点,当发送消息给login这个Exchange时,如果消息没有指定Routing Key,则被投递到q_app和q_mail,如果消息指定了Routing Key=”login_failed”,那么消息被投递到q_sms。
配置好RabbitMQ后,我们就可以基于Spring Boot开发AMQP程序。
我们首先创建Spring Boot工程springboot-rabbitmq,并添加如下依赖引入RabbitMQ:
<dependency><groupId>org.springframework.boot</groupId><artifactId>spring-boot-starter-amqp</artifactId></dependency>
然后在application.yml中添加RabbitMQ相关配置:
spring:rabbitmq:host: localhostport: 5672username: guestpassword: guest
我们还需要在Application中添加一个MessageConverter:
MessageConverter用于将Java对象转换为RabbitMQ的消息。默认情况下,Spring Boot使用SimpleMessageConverter,只能发送String和byte[]类型的消息,不太方便。使用Jackson2JsonMessageConverter,我们就可以发送JavaBean对象,由Spring Boot自动序列化为JSON并以文本消息传递。
@Componentpublic class MessagingService {RabbitTemplate rabbitTemplate;public void sendRegistrationMessage(RegistrationMessage msg) {rabbitTemplate.convertAndSend("registration", "", msg);}public void sendLoginMessage(LoginMessage msg) {String routingKey = msg.success ? "" : "login_failed";rabbitTemplate.convertAndSend("login", routingKey, msg);}}
发送消息时,使用convertAndSend(exchange, routingKey, message)可以指定Exchange、Routing Key以及消息本身。这里传入JavaBean后会自动序列化为JSON文本。上述代码将RegistrationMessage发送到registration,将LoginMessage发送到login,并根据登录是否成功来指定Routing Key。
接收消息时,需要在消息处理的方法上标注@RabbitListener:
@Componentpublic class QueueMessageListener {final Logger logger = LoggerFactory.getLogger(getClass());static final String QUEUE_MAIL = "q_mail";static final String QUEUE_SMS = "q_sms";static final String QUEUE_APP = "q_app";@RabbitListener(queues = QUEUE_MAIL)public void onRegistrationMessageFromMailQueue(RegistrationMessage message) throws Exception {logger.info("queue {} received registration message: {}", QUEUE_MAIL, message);}logger.info("queue {} received registration message: {}", QUEUE_SMS, message);}@RabbitListener(queues = QUEUE_MAIL)public void onLoginMessageFromMailQueue(LoginMessage message) throws Exception {logger.info("queue {} received message: {}", QUEUE_MAIL, message);}@RabbitListener(queues = QUEUE_SMS)public void onLoginMessageFromSmsQueue(LoginMessage message) throws Exception {logger.info("queue {} received message: {}", QUEUE_SMS, message);}@RabbitListener(queues = QUEUE_APP)public void onLoginMessageFromAppQueue(LoginMessage message) throws Exception {logger.info("queue {} received message: {}", QUEUE_APP, message);}}
上述代码一共定义了5个Consumer,监听3个Queue。
启动应用程序,我们注册一个新用户,然后发送一条RegistrationMessage消息。此时,根据registration这个Exchange的设定,我们会在两个Queue收到消息:
当我们登录失败时,发送LoginMessage并设定Routing Key为login_failed,此时,只有q_sms会收到消息:
... c.i.learnjava.service.UserService : try login by bob@example.com...... c.i.l.service.QueueMessageListener : queue q_sms received message: [LoginMessage: email=bob@example.com, name=(unknown), success=false, timestamp=1594559886722]
登录成功后,发送LoginMessage,此时,q_mail和q_app将收到消息:
... c.i.learnjava.service.UserService : try login by bob@example.com...... c.i.l.service.QueueMessageListener : queue q_app received message: [LoginMessage: email=bob@example.com, name=Bob, success=true, timestamp=1594559895251]
RabbitMQ还提供了使用Topic的Exchange(此Topic指消息的标签,并非JMS的Topic概念),可以使用进行匹配并路由。可见,掌握RabbitMQ的核心是理解其消息的路由规则。
直接指定一个Queue并投递消息也是可以的,此时指定Routing Key为Queue的名称即可,因为RabbitMQ提供了一个default exchange用于根据Routing Key查找Queue并直接投递消息到指定的Queue。但是要实现一对多的投递就必须自己配置Exchange。
练习
从下载练习:使用RabbitMQ (推荐使用快速下载)
Spring Boot提供了AMQP的集成,默认使用RabbitMQ作为AMQP消息服务器。
读后有收获可以支付宝请作者喝咖啡,读后有疑问请加微信群讨论: