
官方10年前开始就一直在致力于优化器代码的重构工作,目的是能确保在SQL的执行过程中有清晰的阶段,包括分离Parse和Resolve阶段、更好的支持更多新的语法、保证Name和Type的解析、尽量在Prepare阶段做完Transformations,这样能够很容易的支持CTEs、Windows函数、LATERAL语法、JSON的Table函数和Windows函数。当然,最重要的重构当数Iterator执行器。这个早期MySQL版本的优化器执行器逻辑:
不过本文还要普及一些MySQL基础的知识。
首先我们先了解Parse后的AST树到底是长什么样子?先了解重要的两个结构: SELECT_LEX & SELECT_LEX_UNIT
SELECT_LEX: 代表了SELECT本身,也就是SQL SELECT的关键字就会对应一个SELECT_LEX的结构。 SELECT_LEX_UNIT: 代表了带UNION的一堆SELECT,当然也可以代表一个SELECT。
下面这段是SELECT_LEX_UNIT/SELECT_LEX的类结构中,和查询层次相关的一些成员变量
我们来拿一个真实的例子来举例说明:
FROM ttt1)UNION ALL(SELECT *FROM(SELECT *FROM ttt2) AS a,(SELECT *FROM ttt3UNION ALL SELECT *FROM ttt4) AS b)
实际中该查询的标准内存结构就是这样的,
这里需要注意的是,MySQL官方的 [WL#5275: Process subqueries in FROM clause in the same way as] view支持可以把子查询提升到上层查询中。优化器会调用SELECT_LEX::resolve_placeholder_tables -> SELECT_LEX::merge_derived来避免materialize那些可以提升到上层查询的子查询。外部也可以通过set optimizer_switch=’derived_merge=on/off’来进行开关,下面来对比下8.0.13和8.0.18对于该优化的执行计划展现。
8.0.13 derived_merge off vs on+----+-------------+------------+------------+------+---------------+------+---------+------+------+----------+---------------------------------------+| id | select_type | table | partitions | type | possible_keys | key | key_len | ref | rows | filtered | Extra |+----+-------------+------------+------------+------+---------------+------+---------+------+------+----------+---------------------------------------+| 1 | PRIMARY | ttt1 | NULL | ALL | NULL | NULL | NULL | NULL | 1 | 100.00 | NULL || 2 | UNION | <derived3> | NULL | ALL | NULL | NULL | NULL | NULL | 2 | 100.00 | NULL || 2 | UNION | <derived4> | NULL | ALL | NULL | NULL | NULL | NULL | 4 | 100.00 | Using join buffer (Block Nested Loop) || 4 | DERIVED | ttt3 | NULL | ALL | NULL | NULL | NULL | NULL | 1 | 100.00 | NULL || 5 | UNION | ttt4 | NULL | ALL | NULL | NULL | NULL | NULL | 1 | 100.00 | NULL || 3 | DERIVED | ttt2 | NULL | ALL | NULL | NULL | NULL | NULL | 1 | 100.00 | NULL |+----+-------------+------------+------------+------+---------------+------+---------+------+------+----------+---------------------------------------+6 rows in set, 1 warning (0.01 sec)+----+-------------+------------+------------+------+---------------+------+---------+------+------+----------+---------------------------------------+| id | select_type | table | partitions | type | possible_keys | key | key_len | ref | rows | filtered | Extra |+----+-------------+------------+------------+------+---------------+------+---------+------+------+----------+---------------------------------------+| 1 | PRIMARY | ttt1 | NULL | ALL | NULL | NULL | NULL | NULL | 1 | 100.00 | NULL || 2 | UNION | ttt2 | NULL | ALL | NULL | NULL | NULL | NULL | 1 | 100.00 | NULL || 2 | UNION | <derived4> | NULL | ALL | NULL | NULL | NULL | NULL | 4 | 100.00 | Using join buffer (Block Nested Loop) || 4 | DERIVED | ttt3 | NULL | ALL | NULL | NULL | NULL | NULL | 1 | 100.00 | NULL || 5 | UNION | ttt4 | NULL | ALL | NULL | NULL | NULL | NULL | 1 | 100.00 | NULL |+----+-------------+------------+------------+------+---------------+------+---------+------+------+----------+---------------------------------------+5 rows in set, 1 warning (0.02 sec)8.0.18 derived_merge off vs on| -> Append-> Stream results-> Table scan on ttt1 (cost=0.35 rows=1)-> Stream results-> Inner hash join-> Table scan on b-> Union materialize-> Table scan on ttt3 (cost=0.35 rows=1)-> Table scan on ttt4 (cost=0.35 rows=1)-> Hash-> Table scan on a-> Materialize-> Table scan on ttt2 (cost=0.35 rows=1)| -> Append-> Stream results-> Table scan on ttt1 (cost=0.35 rows=1)-> Stream results-> Inner hash join-> Table scan on b-> Union materialize-> Table scan on ttt3 (cost=0.35 rows=1)-> Table scan on ttt4 (cost=0.35 rows=1)-> Hash-> Table scan on ttt2 (cost=0.35 rows=1)
通过优化后,该查询的内存结构就变成这样了 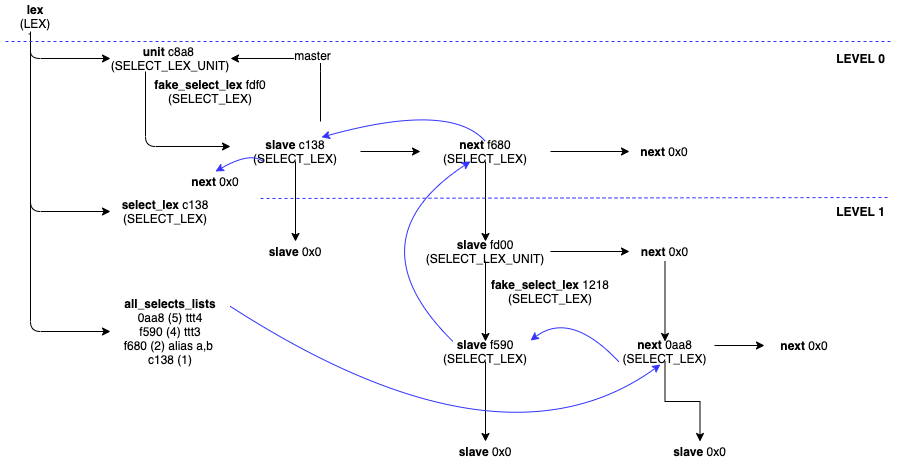
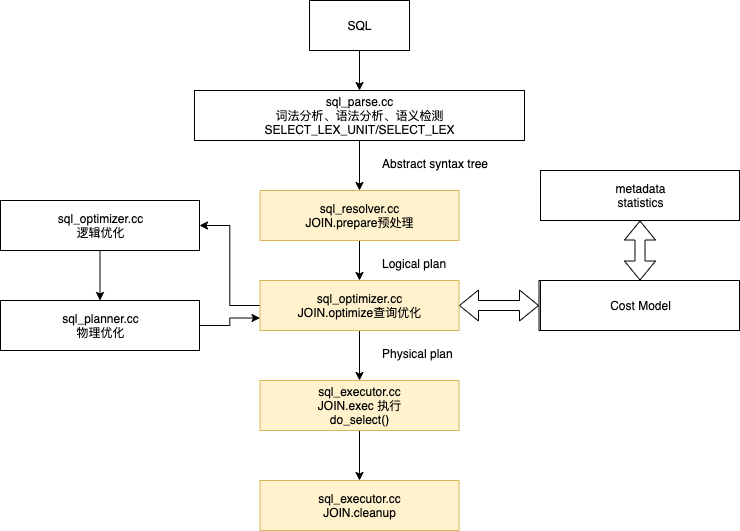
本文由于不是介绍整个优化器的详细优化过程,所以我们这里简单介绍下优化器的一些步骤和方法,根据MySQL官方网站的介绍我们可以知道具体步骤如下:
handle_select()mysql_select()JOIN::prepare()setup_fields()JOIN::optimize() /* optimizer is from here ... */optimize_cond()opt_sum_query()make_join_statistics()get_quick_record_count()choose_plan()/* Find the best way to access tables *//* as specified by the user. */optimize_straight_join()best_access_path()/* Find a (sub-)optimal plan among all or subset *//* of all possible query plans where the user *//* controls the exhaustiveness of the search. */greedy_search()best_extension_by_limited_search()best_access_path()/* Perform an exhaustive search for an optimal plan */find_best()make_join_select() /* ... to here */JOIN::exec()
Class Sql_cmd_dmlSql_cmd_dml::prepare() walks through these common steps:precheck() - performs a coarse-grained authorization check of the statement.open_tables_for_query() - opens the tables and views mentioned in the statement. Views are expanded so that underlying views and tables are opened too.resolve_var_assignments() - resolves variable assignments in the statement.prepare_inner() - performs statement-specific preparation of the statement and is implemented for every subclass of Sql_cmd_dml.Sql_cmd_dml::execute() walks through these common steps:set_statement_timer() - is called if a time limit is applicable to the statement.prepare() is called if the statement is a regular (not preparable) statement.If prepare() is not called, precheck() and open_tables_for_query() are still called since these actions are required also when executing already prepared statements.run_before_dml_hook() is called if the statement is a data change statement, in order to prepare replication actions for the statement.An IGNORE or STRICT mode error handler is set up if applicable. It will be active for the duration of the execution of the statement.lock_tables() is called, unless the statement affects no rows or produces no rows in any tables.Query_cache::store_query() is called to register the statement in the query cache, if applicable.execute_inner() - performs statement-specific optimization and execution of the statement. Sql_cmd_dml::execute_inner() is an implementation for all SELECT statements, all INSERT statements that are based on a SELECT and all multi-table UPDATE and DELETE statements (ie all statements that are implemented using a JOIN object). For all other types of DML statements, a separate implementation for execute_inner() exists.Class Sql_cmd_selectThis is a new class used to implement SELECT statements.It has an implementation of prepare_inner() to prepare SELECT statements.It uses Sql_cmd_dml::execute_inner() to execute SELECT statements.
Sql_cmd_dml是LEX的成员变量m_sql_cmd,而lex->m_sql_cmd大部分会在sql/sql_yacc.yy中new出来,所以目前8.0.13版本整个的流程就变成了下面的流程
8.0.13mysql_execute_command()lex->m_sql_cmd->execute()Sql_cmd_dml::execute()Sql_cmd_dml::prepare()Sql_cmd_select::precheck()Sql_cmd_select::open_tables_for_query()Sql_cmd_select::prepare_inner()SELECT_LEX_UNIT::prepare_limit()SELECT_LEX_UNIT::prepare() (not simple or simple SELECT_LEX::prepare)SELECT_LEX::prepare()......Sql_cmd_dml::execute_innerSELECT_LEX_UNIT::optimize() (not simple or simple SELECT_LEX::optimize)SELECT_LEX::optimize()JOIN::optimize()SELECT_LEX_UNIT::optimize()......SELECT_LEX_UNIT::execute() (not simple or simple SELECT_LEX::optimize)SELECT_LEX::execute()JOIN::exec()JOIN::prepare_result()do_select()sub_select()......SELECT_LEX_UNIT::execute()......SELECT_LEX_UNIT::cleanup(false)
打开set debug=”+d,info,error,query,enter,general,where:O,/tmp/mysqld.trace”可以看到更详细的执行步骤
T@8: | | | | | | | >do_selectT@8: | | | | | | | | >sub_selectT@8: | | | | | | | | | >innobase_trx_initT@8: | | | | | | | | | <innobase_trx_init 3269T@8: | | | | | | | | | >handler::ha_index_initT@8: | | | | | | | | | | >index_initT@8: | | | | | | | | | | <index_init 10243T@8: | | | | | | | | | | >change_active_indexT@8: | | | | | | | | | | | >innobase_get_indexT@8: | | | | | | | | | | | <innobase_get_index 11071T@8: | | | | | | | | | | <change_active_index 11172T@8: | | | | | | | | | <handler::ha_index_init 2793T@8: | | | | | | | | | >handler::ha_index_firstT@8: | | | | | | | | | | >index_firstT@8: | | | | | | | | | | | >index_readT@8: | | | | | | | | | | | | >row_search_mvccT@8: | | | | | | | | | | | | | >row_sel_store_mysql_recT@8: | | | | | | | | | | | | | | >row_sel_store_mysql_field_funcT@8: | | | | | | | | | | | | | | <row_sel_store_mysql_field_func 2921T@8: | | | | | | | | | | | | | <row_sel_store_mysql_rec 3080T@8: | | | | | | | | | | | | <row_search_mvcc 5881T@8: | | | | | | | | | | | <index_read 11012T@8: | | | | | | | | | <handler::ha_index_first 3293T@8: | | | | | | | | | >evaluate_join_recordT@8: | | | | | | | | | | enter: join: 0x7fff99d92d68 join_tab index: 0 table: cat cond: (nil)T@8: | | | | | | | | | | >sub_select_op
这里不在赘述这个stack是因为,我们下面要引入了我们重要的主题部分8.0.18的Iterator执行部分,看看这个与之前的执行有何不同。官方用了很多Worklogs来实现Iterator的执行器。
先来了解下术语: QEP:全称(Query Execution Plan)查询执行计划。 QEP_TAB:全称(Query Execution Plan Table) 查询执行计划表 熟悉我们知道在8.0开始,官方已经慢慢的用Iterator的执行类来替换原有的一些和执行相关的类,所以原有的流程中bool JOIN::optimize(),用于生成一个Query块的执行计划(QEP)就增加了生成Iterator的部分。
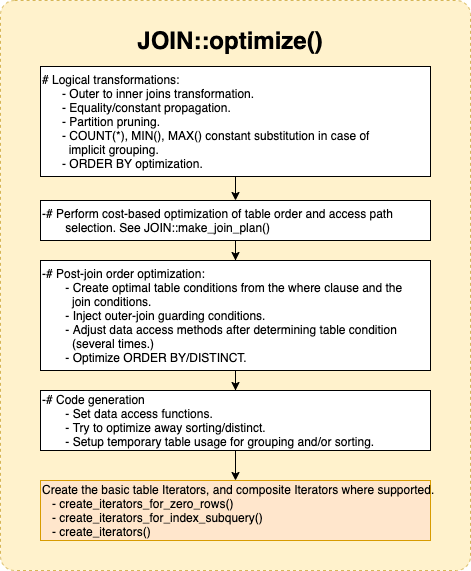
最终要的JOIN::create_iterators主要分两个步骤: 1) 通过create_table_iterators,对于每个特定表,生成对应的基本的RowIterators的继承子类。 2) 通过调用create_root_iterator_for_join,生成组合的iterators,合并每个表的组合行。
然后将生成的iterator赋值到JOIN::m_root_iterator。
JOIN::create_table_iterators里面可以看到需要去轮询所有的表来构建访问方式,调用了最重要的方法QEP_TAB::make_join_readinfo和QEP_TAB::pick_table_access_method,我们来看看和之前非Iterator访问方式有何不同。 在8.0之前,我们看到QEP_TAB是通过一些函数指针和READ_RECORD来设定访问的函数指针:
执行的流程如下:
if (in_first_read){in_first_read= false;error= (*qep_tab->read_first_record)(qep_tab); //设定合适的读取函数,如设定索引读函数/全表扫描函数}elseerror= info->read_record(info);
那么对于第一次QEP_TAB::read_first_record和后续读指针READ_RECORD::read_record可以为下列函数的实现,其中rr代表read record:
int join_init_quick_read_record(QEP_TAB *tab);int join_init_read_record(QEP_TAB *tab);int join_read_first(QEP_TAB *tab);int join_read_last(QEP_TAB *tab);int join_read_last_key(QEP_TAB *tab);join_read_next_sameint join_materialize_derived(QEP_TAB *tab);int join_materialize_semijoin(QEP_TAB *tab);int join_read_prev_same(READ_RECORD *info);static int join_read_const(QEP_TAB *tab);static int read_const(TABLE *table, TABLE_REF *ref);static int join_read_key(QEP_TAB *tab);static int join_read_always_key(QEP_TAB *tab);static int join_no_more_records(READ_RECORD *info);static int join_read_next(READ_RECORD *info);static int join_read_next_same(READ_RECORD *info);static int join_read_prev(READ_RECORD *info);static int join_ft_read_first(QEP_TAB *tab);static int join_ft_read_next(READ_RECORD *info);static int join_read_always_key_or_null(QEP_TAB *tab);static int join_read_next_same_or_null(READ_RECORD *info);int rr_sequential(READ_RECORD *info)static int rr_quick(READ_RECORD *info);int rr_sequential(READ_RECORD *info);static int rr_from_tempfile(READ_RECORD *info);template<bool> static int rr_unpack_from_tempfile(READ_RECORD *info);template<bool> static int rr_unpack_from_buffer(READ_RECORD *info);static int rr_from_pointers(READ_RECORD *info);static int rr_from_cache(READ_RECORD *info);static int init_rr_cache(THD *thd, READ_RECORD *info);static int rr_index_first(READ_RECORD *info);static int rr_index_last(READ_RECORD *info);static int rr_index(READ_RECORD *info);static int rr_index_desc(READ_RECORD *info);
为什么简单的流程,需要指定不同的函数指针呢?原因是因为优化器需要根据不同的规则(RBO)和代价(CBO)去设计巧妙的访问方法,比如表扫描、索引扫描、稀疏扫描等等,那么这样的组合对于Innodb层提供的简单接口来说非常复杂。Innodb层和Server层的接口也不会根据上层的变化不断的修改和增加,所以Server层的执行层,利用自己规定的方法,来进行组合调用。比如我们举例rr_quick函数。
static int rr_quick(READ_RECORD *info){int tmp;while ((tmp= info->quick->get_next())){if (info->thd->killed || (tmp != HA_ERR_RECORD_DELETED)){tmp= rr_handle_error(info, tmp);break;}}return tmp;}
rr_quick增加了一个新的优化的类就是QUICK_SELECT_I接口实现的具体优化类,顾名思义就是比表扫描和索引扫描快速的访问方式,目前官方有7种方式,
enum {QS_TYPE_RANGE = 0,QS_TYPE_INDEX_MERGE = 1,QS_TYPE_RANGE_DESC = 2,QS_TYPE_FULLTEXT = 3,QS_TYPE_ROR_INTERSECT = 4,QS_TYPE_ROR_UNION = 5,QS_TYPE_GROUP_MIN_MAX = 6};
1. Create quick selectquick= new QUICK_XXX_SELECT(...);2. Perform lightweight initialization. This can be done in 2 ways:2.a: Regular initializationif (quick->init()){//the only valid action after failed init() call is deletedelete quick;}2.b: Special initialization for quick selects merged by QUICK_ROR_*_SELECTif (quick->init_ror_merged_scan())delete quick;3. Perform zero, one, or more scans.while (...){// initialize quick select for scan. This may allocate// buffers and/or prefetch rows.if (quick->reset()){//the only valid action after failed reset() call is deletedelete quick;//abort query}// perform the scando{res= quick->get_next();} while (res && ...)}4. Delete the select:delete quick;
显然,rr_quick仍然是执行路径分类下的又一个复杂的路由函数,根据实际READ_RECORD::quick的具体QUICK class来决定剩余的逻辑,那如何对应到Innodb存储的具体函数呢?拿QUICK_RANGE_SELECT这个类来举例,参照如下调用stack:
#x ha_index_first/ha_index_read_map or ha_index_next_same/ha_index_next#0 handler::read_range_first or handler::read_range_next#1 handler::multi_range_read_next (this=0x7f9a78080900, range_info=0x7f9adc38bd40)#2 DsMrr_impl::dsmrr_next (this=0x7f9a78082628, range_info=0x7f9adc38bd40)#3 ha_innobase::multi_range_read_next (this=0x7f9a78080900, range_info=0x7f9adc38bd40)#4 QUICK_RANGE_SELECT::get_next (this=0x7f9a7807b220)#5 rr_quick (info=0x7f9a78103dd8)#6 join_init_read_record (tab=0x7f9a78103d48)#7 sub_select (join=0x7f9a78005bd8, join_tab=0x7f9a78103d48, end_of_records=false)#8 do_select (join=0x7f9a78005bd8)#9 JOIN::exec (this=0x7f9a78005bd8)
现在回到了我们的8.0 Iterator执行器中,我们看到READ_RECORD m_read_record_info将被unique_ptr_destroy_only m_iterator所代替,包括setup_read_record(), init_read_record() and setup_read_record_idx()都将被各种各样的Iterator代替。在Iterator的执行器下,不用关心函数指针的赋值,也不需要有两个QEP_TAB::read_first_record和后续读指针READ_RECORD::read_record,只需要实现RowIterator的子类并实现其定义的接口。
详细可以查看官方的link: https://dev.mysql.com/doc/dev/mysql-server/latest/classTableRowIterator.html
QEP_TAB::pick_table_access_method设置流程变为了下面的方式:
void QEP_TAB::pick_table_access_method() {......switch (type()) {case JT_REF:if (is_pushed_child) {DBUG_ASSERT(!m_reversed_access);iterator = NewIterator<PushedJoinRefIterator>(join()->thd, table(), &ref(), use_order(), &join()->examined_rows);} else if (m_reversed_access) {iterator = NewIterator<RefIterator<true>>(join()->thd, table(), &ref(),use_order(), this,&join()->examined_rows);} else {iterator = NewIterator<RefIterator<false>>(join()->thd, table(), &ref(),use_order(), this,&join()->examined_rows);}used_ref = &ref();break;case JT_REF_OR_NULL:iterator = NewIterator<RefOrNullIterator>(join()->thd, table(), &ref(),use_order(), this,&join()->examined_rows);used_ref = &ref();break;case JT_CONST:iterator = NewIterator<ConstIterator>(join()->thd, table(), &ref(),&join()->examined_rows);break;case JT_EQ_REF:if (is_pushed_child) {iterator = NewIterator<PushedJoinRefIterator>(join()->thd, table(), &ref(), use_order(), &join()->examined_rows);} else {iterator = NewIterator<EQRefIterator>(join()->thd, table(), &ref(), use_order(), &join()->examined_rows);}used_ref = &ref();break;......case JT_ALL:case JT_RANGE:case JT_INDEX_MERGE:if (using_dynamic_range) {iterator = NewIterator<DynamicRangeIterator>(join()->thd, table(), this,&join()->examined_rows);} else {iterator =create_table_iterator(join()->thd, nullptr, this, false,&join()->examined_rows, &m_using_table_scan);}......}
执行的流程变成了:
unique_ptr<RowIterator> iterator(new ...);if (iterator->Init())return true;while (iterator->Read() == 0) {...}
Join访问对比
MySQL 的 join 操作主要是采用NestLoop的算法,其中涉及的主要函数有如下 do_select()、sub_select()、evaluate_join_record(),当然还有BNL和BKA等等,我们就不再这里赘述。
static int do_select(JOIN *join){... ...if (join->plan_is_const() && !join->need_tmp) {... ...} else {QEP_TAB *qep_tab= join->qep_tab + join->const_tables;DBUG_ASSERT(join->primary_tables);error= join->first_select(join,qep_tab,0); ← 非结束选取if (error >= NESTED_LOOP_OK)error= join->first_select(join,qep_tab,1); ← 结束选取}}enum_nested_loop_state sub_select(JOIN *join,JOIN_TAB *join_tab,bool end_of_records){... ...if (end_of_records){enum_nested_loop_state nls=(*join_tab->next_select)(join,join_tab+1,end_of_records); ← 一般是sub_select/最后一个是end_send/end_send_groupDBUG_RETURN(nls);}READ_RECORD *info= &join_tab->read_record;... ...while (rc == NESTED_LOOP_OK && join->return_tab >= qep_tab_idx){int error;if (in_first_read) ← 读取第一条记录{in_first_read= false;error= (*qep_tab->read_first_record)(qep_tab);}elseerror= info->read_record(info); ← 循环读取记录直到结束位置......rc= evaluate_join_record(join, qep_tab); ← 评估是否符合条件,连接下一个表}... ...}static enum_nested_loop_stateevaluate_join_record(JOIN *join, JOIN_TAB *join_tab){... ...Item *condition= join_tab->condition(); ← 查询条件bool found= TRUE;... ...if (condition){found= MY_TEST(condition->val_int()); ← 评估是否符合条件... ...if (found){enum enum_nested_loop_state rc;/* A match from join_tab is found for the current partial join. */rc= (*join_tab->next_select)(join, join_tab+1, 0);join->thd->get_stmt_da()->inc_current_row_for_warning();if (rc != NESTED_LOOP_OK)DBUG_RETURN(rc);... ...}
那么整个执行的流程串起来就是:
JOIN::exec() ← 执行一个Query Block|-THD_STAGE_INFO() ← 设置线程的状态为executing|-set_executed() ← 设置为执行状态,JOIN::executed=true|-prepare_result()|-send_result_set_metadata() ← 先将元数据发送给客户端||-do_select() ←### 查询的实际入口函数,做JOIN操作,会返回给客户端或写入表||-join->first_select(join,qep_tab,0) ← 1. 执行nest loop操作,默认会调用sub_select()函数,| | ← 也即循环调用rnd_next()+evaluate_join_record()| || |###while循环读取数据###| | ← 2. 调用存储引擎接口读取数据| |-qep_tab->read_first_record() ← 2.1. 首次调用,实际为join_init_read_record()| | |-tab->quick()->reset() ← 对于quick调用QUICK_RANGE_SELECT::reset()函数| | | |-file->ha_index_init() ← 会调用存储引擎接口| | | | |-index_init()| | | | |-change_active_index()| | | | |-innobase_get_index()| | | |-file->multi_range_read_init()| | |-init_read_record() ← 设置read_record指针,在此为rr_quick| || |-info->read_record() ← 2.2 再次调用,如上,该函数在init_read_record()中初始化| | |-info->quick->get_next() ← 实际调用QUICK_RANGE_SELECT::get_next()| | |-file->multi_range_read_next() ← 调用handler.cc文件中函数| | |-read_range_first() ← 对于第一次调用| | | |-ha_index_read_map() ← 存储引擎调用| | | |-index_read()| | | |-row_search_mvcc()| | || | |-read_range_next() ← 对于非第一次调用| | |-ha_index_next()| | |-general_fetch()| | |-row_search_mvcc()| || |-evaluate_join_record() ← 2.3 处理读取的记录,判断是否满足条件,包括了第一条记录| |-qep_tab->next_select() ← 对于查询,实际会调用end_send()| |-Query_result_send::send_data()||-join->first_select(join,qep_tab,1) ← 3. 一个table已经读取数据结束,同样默认调用sub_select()| |-join_tab->next_select() ← 调用该函数处理下个表或者结束处理||-join->select_lex->query_result()->send_eof()
这次我们要对比下新的执行引擎的变化,既然表的访问方式已经从函数指针变为Iterator的Init/Read两个接口,我们来看其实对于Iterator引擎更容易理解了,JOIN::create_table_iterators本身就可以构造出简单的Iterators结构:
| -> Limit: 1 row(s)-> Sort: ttt1.c1, limit input to 1 row(s) per chunk (cost=0.45 rows=2)-> Filter: (ttt1.c1 > 2)-> Table scan on ttt1
而JOIN::create_root_iterator_for_join可以构造出更为标准的Iterator火山模型结构:
| -> Limit: 1 row(s)-> Sort: ttt1.c1, limit input to 1 row(s) per chunk-> Stream results-> Inner hash join (ttt1.c1 = ttt2.c1) (cost=0.90 rows=1)-> Table scan on ttt1 (cost=0.45 rows=2)-> Hash-> Filter: (ttt2.c1 > 0) (cost=0.35 rows=1)-> Table scan on ttt2 (cost=0.35 rows=1)|
create_root_iterator_for_join中最为重要的函数ConnectJoins,里面负责生成相应的Semijoin/Hashjoin/Antijoin/Nestloopjoin等等的组合的Iterator。因为Hashjoin另有篇幅介绍,这里举例来说NestLoopIterator的实现:
最后我们用Hashjoin看下新的执行流程吧:
SELECT_LEX_UNIT::execute() ← 执行一个Query Unit|-SELECT_LEX_UNIT::ExecuteIteratorQuery|-THD_STAGE_INFO() ← 设置线程的状态为executing|-query_result->start_execution(thd) ← 设置为执行状态,Query result execution_started = true;|-query_result->send_result_set_metadata() ← 先将元数据发送给客户端|-set_executed(); ← Unit executed = true;||-m_root_iterator->Init() ← 所有Iterator递归Init,此处Iterator为HashJoinIterator| |-HashJoinIterator::Init()| | |-TableScanIterator::Init()| | | |-handler::ha_rnd_init()|| | |-HashJoinIterator::BuildHashTable()| | | |-TableScanIterator::Read()| | | | |-handler::ha_rnd_next()| | | | | |-ha_innobase::rnd_next()|| |-HashJoinIterator::InitProbeIterator()| | |-TableScanIterator::Init()| | | |-handler::ha_rnd_init()| | | | |-ha_innobase::rnd_init()|| ###while循环读取数据###|-m_root_iterator->Read() ← 所有Iterator递归Read,此处Iterator为HashJoinIterator| |-HashJoinIterator::Read()| |-HashJoinIterator::ReadRowFromProbeIterator()| | |-TableScanIterator::Read()| | | |-handler::ha_rnd_next()| | | | |-ha_innobase::rnd_next()|
https://dev.mysql.com/doc/internals/en/select-structure.html

