
Extrude
Mode
Edit Mode
Menu
Armature ‣ Extrude
Hotkey
E, Shift-E
When you press E, for each selected tip (either explicitly or implicitly), a new bone is created. This bone will be the child of “its” tip owner, and connected to it. As usual, once extrusion is done, only the new bones’ tips are selected, and in select mode, so you can place them to your liking. See Fig. .
You also can use the rotating/scaling extrusions, as with meshes, by pressing respectively E R and E S — as well as locked extrusion along a global or local axis.
A single selected bone’s tip. | 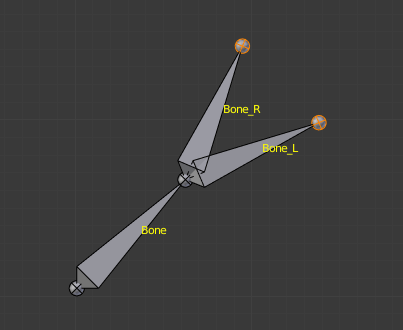 The two mirror-extruded bones. |
Bones have an extra “mirror extruding” tool, called by pressing Shift-E. By default, it behaves exactly like the standard extrusion. But once you have enabled editing option, each extruded tip will produce two new bones, having the same name except for the “_L”/ “_R” suffix (for left/right, see the naming conventions). The “_L” bone behaves like the single one produced by the default extrusion — you can move, rotate or scale it exactly the same way. The “_R” bone is its mirror counterpart (along the armature’s local X axis), see Fig. .
Important
Canceling the extrude action causes the newly created bones to snap back to the source position, (creating zero length bones). These will be removed when exiting Edit Mode, however, they can cause confusion and it’s unlikely you want to keep them. If you realize the problem immediately undo the extrude action.
Reference
Mode
Edit Mode
Hotkey
Ctrl-RMB
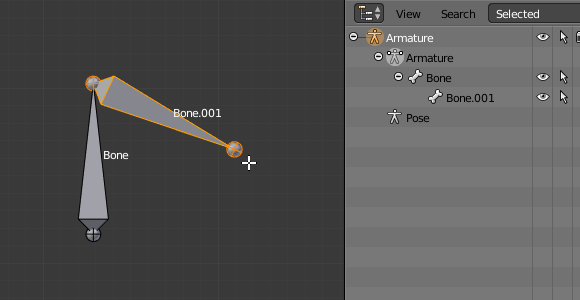
If at least one bone is selected, Ctrl-RMB-clicking adds a new bone.
About the new bone’s tip:
After you Ctrl-RMB-clicked it becomes the active element in the armature, it appears to be right where you clicked, but (as in mesh editing) it will be on the plane parallel to the view and passing through the 3D cursor.
The position of the root and the parenting of the new bone depends on the active element:
Ctrl-clicking when the active element is a bone.
If the active element is a bone:
The new bone’s root is placed on the active bone’s tip.
If the active element is a tip:
The new bone’s root is placed on the active tip.
The new bone is parented and connected to the bone owning the active tip (check the Outliner in Fig. Ctrl-clicking when the active element is a tip.).
Ctrl-clicking when the active element is a disconnected root.
If the active element is a disconnected root:
The new bone is not parented to the bone owning the active root (check the Outliner in Fig. Ctrl-clicking when the active element is a disconnected root.).
And hence the new bone will not be connected to any bone.
Ctrl-clicking when the active element is a connected root.
If the active element is a connected root:
The new bone’s root is placed on the active root.
This should be obvious because if the active element is a connected root then the active element will be also the tip of the parent bone, so it is the same as the second case.

