
Signals
Note
You can read more about the observer pattern here:
Signals are a way to decouple your game objects, which leads to better organized and more manageable code. Instead of forcing game objects to expect other objects to always be present, they can instead emit signals that all interested objects can subscribe to and respond to.
Below you can see some examples of how you can use signals in your own projects.
To see how signals work, let’s try using a Timer node. Create a new scene with a Node2D and two children: a Timer and a . In the Scene dock, rename Node2D to TimerExample.
For the Sprite’s texture, you can use the Godot icon, or any other image you like. Do so by selecting in the Sprite’s Texture attribute drop-down menu. Attach a script to the root node, but don’t add any code to it yet.
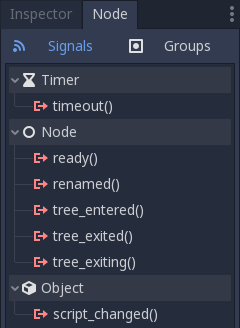
Your scene tree should look like this:
In the Timer node’s properties, check the “On” box next to Autostart. This will cause the timer to start automatically when you run the scene. You can leave the Wait Time at 1 second.
Next to the “Inspector” tab is a tab labeled “Node”. Click on this tab and you’ll see all of the signals that the selected node can emit. In the case of the Timer node, the one we’re concerned with is “timeout”. This signal is emitted whenever the Timer reaches 0.
Click on the “timeout()” signal and click “Connect…” at the bottom of the signals panel. You’ll see the following window, where you can define how you want to connect the signal:
On the left side, you’ll see the nodes in your scene and can select the node that you want to “listen” for the signal. Note that the Timer node is blue, this is a visual indication that it’s the node that is emitting the signal. Select the root node.
Warning
If you toggle the Advanced menu, you’ll see on the right side that you can bind an arbitrary number of arguments of (possibly) different types. This can be useful when you have more than one signal connected to the same method, as each signal propagation will result in different values for those extra call arguments.
On the bottom of the window is a field labeled “Receiver Method”. This is the name of the function in the target node’s script that you want to use. By default, Godot will create this function using the naming convention _on_<node_name>_<signal_name> but you can change it if you wish.
Click “Connect” and you’ll see that the function has been created in the script:
GDScript
C#
public class TimerExample : Node2D{public void _on_Timer_timeout(){// Replace with function body.}}
Now we can replace the placeholder code with whatever code we want to run when the signal is received. Let’s make the Sprite blink:
GDScript
C#
extends Node2Dfunc _on_Timer_timeout():# Note: the `$` operator is a shorthand for `get_node()`,# so `$Sprite` is equivalent to `get_node("Sprite")`.$Sprite.visible = !$Sprite.visible
public class TimerExample : Node2D{public void _on_Timer_timeout(){var sprite = GetNode<Sprite>("Sprite");sprite.Visible = !sprite.Visible;}
Run the scene and you’ll see the Sprite blinking on and off every second. You can change the Timer’s Wait Time property to alter this.
You can also make the signal connection in code rather than with the editor. This is usually necessary when you’re instancing nodes via code and so you can’t use the editor to make the connection.
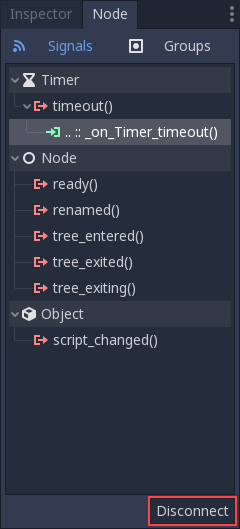
First, disconnect the signal by selecting the connection in the Timer’s “Node” tab and clicking disconnect.
To make the connection in code, we can use the connect function. We’ll put it in _ready() so that the connection will be made on run. The syntax of the function is . Here is the code for our Timer connection:
GDScript
C#
public class TimerExample : Node2D{public override void _Ready(){GetNode("Timer").Connect("timeout", this, nameof(_on_Timer_timeout));}public void _on_Timer_timeout(){var sprite = GetNode<Sprite>("Sprite");sprite.Visible = !sprite.Visible;}}
GDScript
C#
extends Node2Dsignal my_signal
public class Main : Node2D{[Signal]public delegate void MySignal();}
Once declared, your custom signals will appear in the Inspector and can be connected in the same way as a node’s built-in signals.
To emit a signal via code, use the emit_signal function:
GDScript
C#
public class Main : Node2D{public override void _Ready(){EmitSignal(nameof(MySignal));}}
A signal can also optionally declare one or more arguments. Specify the argument names between parentheses:
GDScript
C#
extends Nodesignal my_signal(value, other_value)
public class Main : Node{[Signal]public delegate void MySignal(bool value, int other_value);}
Note
The signal arguments show up in the editor’s node dock, and Godot can use them to generate callback functions for you. However, you can still emit any number of arguments when you emit signals. So it’s up to you to emit the correct values.
To pass values, add them as the second argument to the emit_signal function:
GDScript
C#
public class Main : Node{[Signal]public delegate void MySignal(bool value, int other_value);public override void _Ready(){EmitSignal(nameof(MySignal), true, 42);}
Many of Godot’s built-in node types provide signals you can use to detect events. For example, an Area2D representing a coin emits a signal whenever the player’s physics body enters its collision shape, allowing you to know when the player collected it.

