
Xcode
- From Xcode’s main screen create a new project using the Other > External Build System template.
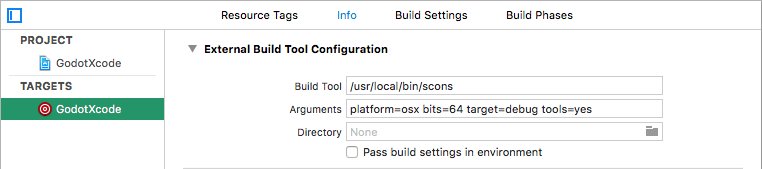
Open your build targets from the Targets section and select the Info tab.
Fill out the form with the following settings:
- Add a Command Line Tool target which will be used for indexing the project by choosing File > New > Target….
- Select OS X > Application > Command Line Tool.
Note
Name it something so you know not to compile with this target (e.g. ).
- Set Header Search Paths to the absolute path to the Godot root folder. You need to include subdirectories as well. To achieve that, add two two asterisks (
**) to the end of the path, e.g. . - Add the Godot source to the project by dragging and dropping it into the project file browser.
- Uncheck Create external build system project.

- Next select Create groups for the Added folders option and check only your command line indexing target in the Add to targets section.
- Xcode will now index the files. This may take a few minutes.
- Once Xcode is done indexing, you should have jump-to-definition, autocompletion, and full syntax highlighting.
Debugging the project
To enable debugging support you need to edit the external build target’s build and run schemes.
- Open the scheme editor of the external build target.
- Add a new script run action
- Under Provide build settings from select your project. This allows to reference the project directory within the script.
- Create a script that will give the binary a name that Xcode can recognize, e.g.:
- Build the external build target.
- Open the scheme editor again and select Run.
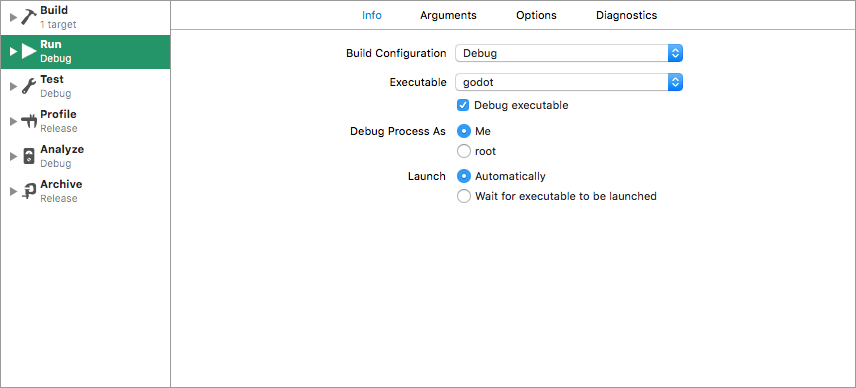
- Set the Executable to the file you linked in your post-build action script.
- Check Debug executable.
To check that everything is working, put a breakpoint in and run the project.

