
Custom post-processing
Post-processing effects are shaders applied to a frame after Godot rendered it. You first want to render your scene into a , then render the inside a ViewportTexture and show it on the screen.
The easiest way to implement a custom post-processing shader is to use Godot’s built-in ability to read from the screen texture. If you’re not familiar with this, you should read the first.
Note
As of the time of writing, Godot does not support rendering to multiple buffers at the same time. Your post-processing shader will not have access to normals or other render passes. You only have access to the rendered frame.
You will need a Viewport to render your scene to, and a scene to render your Viewport on the screen. You can use a ViewportContainer to display your Viewport on the entire screen or inside another node.
Note
Rendering using a Viewport gives you control over how the scene render, including the framerate, and you can use the ViewportContainer to render 3D objects in a 2D scene.
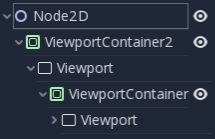
For this demo, we will use a Node2D with a ViewportContainer and finally a Viewport. Your Scene tab should look like this:
Add a new to the ViewportContainer, and assign a new shader resource to it. You can access your rendered Viewport with the built-in TEXTURE uniform.
Note
You can choose not to use a ViewportContainer, but if you do so, you will need to create your own uniform in the shader and pass the Viewport texture in manually, like so:
And you can pass the texture into the shader from GDScript like so:
Copy the following code to your shader. The above code is a single pass edge detection filter, a Sobel filter.
Note
The Sobel filter reads pixels in a 9x9 grid around the current pixel and adds them together, using weight. What makes it interesting is that it assigns weights to each pixel; +1 for each of the eight around the center and -8 for the center pixel. The choice of weights is called a “kernel”. You can use different kernels to create edge detection filters, outlines, and all sorts of effects.
To make a multi-pass post-processing shader, you stack Viewport nodes. In the example above, you rendered the content of one Viewport object into the root , through a ViewportContainer node. You can do the same thing for a multi-pass shader by rendering the content of one Viewport into another and then rendering the last Viewport into the root Viewport.
Your scene hierarchy will look something like this:
Godot will render the bottom Viewport node first. So if the order of the passes matters for your shaders, make sure that you assign the shader you want to apply first to the lowest ViewportContainer in the tree.
Note
You can also render your Viewports separately without nesting them like this. You just need to use two Viewports and to render them one after the other.
Apart from the node structure, the steps are the same as with the single-pass post-processing shader.
As an example, you could write a full screen Gaussian blur effect by attaching the following pieces of code to each of the . The order in which you apply the shaders does not matter:
Using the above code, you should end up with a full screen blur effect like below.
For more information on how Viewport nodes work, see the Viewports Tutorial.

