Baked lightmaps
Unlike s, Baked Lightmaps are completely static. Once baked, they can’t be modified at all. They also don’t provide the scene with reflections, so using together with it on interiors (or using a Sky on exteriors) is a requirement to get good quality.
As they are baked, they have fewer problems than GIProbe regarding light bleeding, and indirect light can look better if using Raytrace mode on high quality setting (but baking can take a while).
In the end, deciding which indirect lighting approach is better depends on your use case. In general, GIProbe looks better and is much easier to set up. For mobile or low-end compatibility, though, Baked Lightmaps are your only choice.
Visual comparison
Here are some comparisons of how Baked Lightmaps vs. GIProbe look. Notice that lightmaps are more accurate, but also suffer from the fact that lighting is on an unwrapped texture, so transitions and resolution may not be that good. GIProbe looks less accurate (as it’s an approximation), but smoother overall.
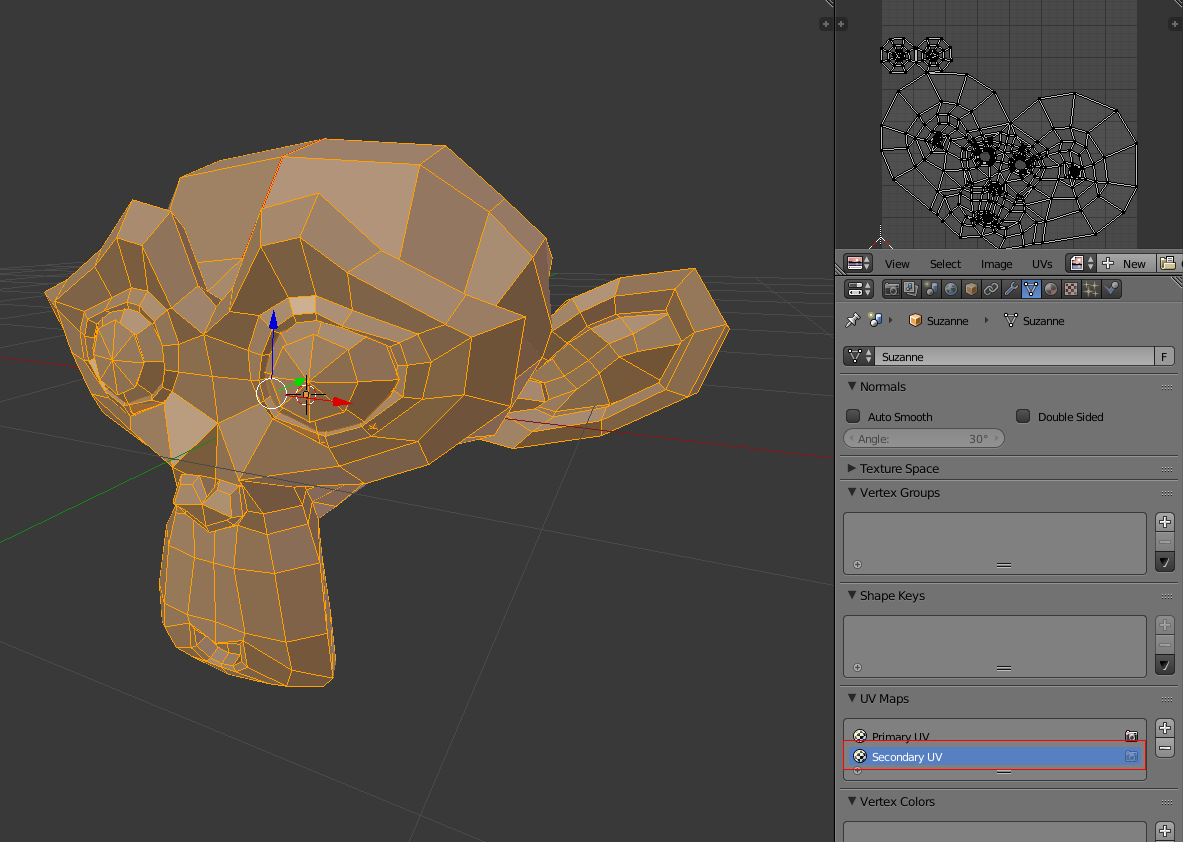
First of all, before the lightmapper can do anything, the objects to be baked need an UV2 layer and a texture size. An UV2 layer is a set of secondary texture coordinates that ensures any face in the object has its own place in the UV map. Faces must not share pixels in the texture.
There are a few ways to ensure your object has a unique UV2 layer and texture size:
One option is to do it from your favorite 3D app. This approach is generally not recommended, but it’s explained first so that you know it exists. The main advantage is that, on complex objects that you may want to re-import a lot, the texture generation process can be quite costly within Godot, so having it unwrapped before import can be faster.
Simply do an unwrap on the second UV2 layer.
And import normally. Remember you will need to set the texture size on the mesh after import.
If you use external meshes on import, the size will be kept. Be wary that most unwrappers in 3D DCCs are not quality oriented, as they are meant to work quickly. You will mostly need to use seams or other techniques to create better unwrapping.
Unwrap from within Godot
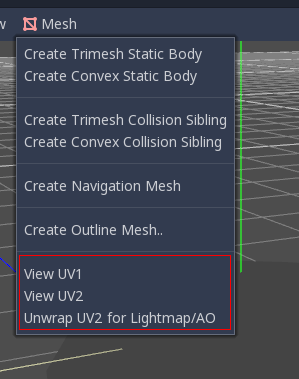
Godot has an option to unwrap meshes and visualize the UV channels. It can be found in the Mesh menu:
Unwrap on scene import
This is probably the best approach overall. The only downside is that, on large models, unwrapping can take a while on import. Just select the imported scene in the filesystem dock, then go to the Import tab. There, the following option can be modified:
The Light Baking mode needs to be set to “Gen Lightmaps”. A texel size in world units must also be provided, as this will determine the final size of the lightmap texture (and, in consequence, the UV padding in the map).
The effect of setting this option is that all meshes within the scene will have their UV2 maps properly generated.
As a word of warning: When reusing a mesh within a scene, keep in mind that UVs will be generated for the first instance found. If the mesh is re-used with different scales (and the scales are wildly different, more than half or twice), this will result in inefficient lightmaps. Just don’t reuse a source mesh at different scales if you are planning to use lightmapping.
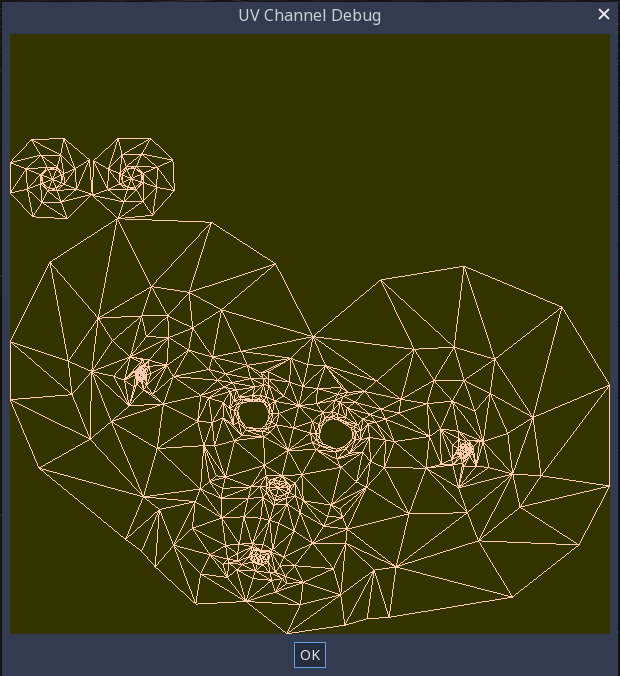
In the mesh menu mentioned before, the UV2 texture coordinates can be visualized. Make sure, if something is failing, to check that the meshes have these UV2 coordinates:
Setting up the scene
Before anything is done, a BakedLightmap Node needs to be added to a scene. This will enable light baking on all nodes (and sub-nodes) in that scene, even on instanced scenes.
A sub-scene can be instanced several times, as this is supported by the baker, and each will be assigned a lightmap of its own (just make sure to respect the rule about scaling mentioned before):
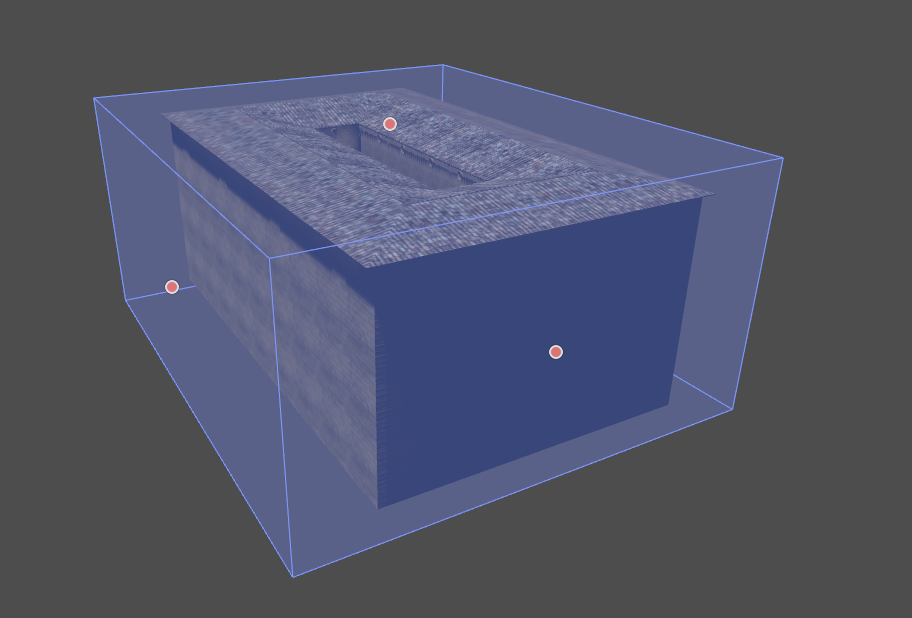
Configure bounds
Lightmap needs an approximate volume of the area affected because it uses it to transfer light to dynamic objects inside it (more on that later). Just cover the scene with the volume as you do with :
Setting up meshes
For a MeshInstance node to take part in the baking process, it needs to have the “Use in Baked Light” property enabled.
When auto-generating lightmaps on scene import, this is enabled automatically.
Lights can be disabled (no bake) or be fully baked (direct and indirect). This can be controlled from the Bake Mode menu in lights:
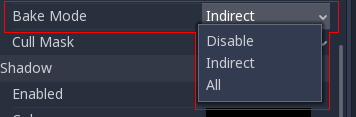
The modes are:
- Disabled: Light is ignored in baking. Keep in mind hiding a light will have no effect for baking, so this must be used instead.
- Indirect: This is the default mode. Only indirect lighting will be baked.
- All: Both indirect and direct lighting will be baked. If you don’t want the light to appear twice (dynamically and statically), simply hide it.
Baking quality
BakedLightmap uses, for simplicity, a voxelized version of the scene to compute lighting. Voxel size can be adjusted with the Bake Subdiv parameter. More subdivision results in more detail, but also takes more time to bake.
In general, the defaults are good enough. There is also a Capture Subdivision (that must always be equal to or less than the main subdivision), which is used for capturing light in dynamic objects (more on that later). Its default value is also good enough for most cases.
Besides the capture size, quality can be modified by setting the Bake Mode. Two modes of capturing indirect are provided:
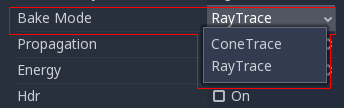
- Voxel Cone: Trace: Is the default one; it’s less precise, but faster. Looks similar to (but slightly better than) .
To begin the bake process, just push the big Bake Lightmaps button on top when selecting the BakedLightmap node:
This can take from seconds to minutes (or hours) depending on scene size, bake method and quality selected.
Configuring bake
Several more options are present for baking:
- Bake Subdiv: The Godot lightmapper uses a grid to transfer light information around; the default value is fine and should work for most cases. Increase it in case you want better lighting on small details or your scene is large.
- Capture Subdiv: This is the grid used for real-time capture information (lighting dynamic objects). Default value is generally OK, it’s usually smaller than Bake Subdiv and can’t be larger than it.
- Bake Quality: Three bake quality modes are provided, Low, Medium and High. Higher quality takes more time.
- Bake Mode: The baker can use two different techniques: Voxel Cone Tracing (fast, but approximate), or RayTracing (slow, but accurate).
- Propagation: Used for the Voxel Cone Trace mode. Works just like in .
- HDR: If disabled, lightmaps are smaller, but can’t capture any light over white (1.0).
- Image Path: Where lightmaps will be saved. By default, on the same directory as the scene (“.”), but can be tweaked.
- Extents: Size of the area affected (can be edited visually)
- Light Data: Contains the light baked data after baking. Textures are saved to disk, but this also contains the capture data for dynamic objects, which can be a bit heavy. If you are using .tscn formats (instead of .scn), you can save it to disk.
Dynamic objects
In other engines or lightmapper implementations, you are required to manually place small objects called “lightprobes” all around the level to generate capture data. This is used to, then, transfer the light to dynamic objects that move around the scene.
However, this implementation of lightmapping uses a different method. The process is automatic, so you don’t have to do anything. Just move your objects around, and they will be lit accordingly. Of course, you have to make sure you set up your scene bounds accordingly or it won’t work.