
Exporting projects
When more developers (and even non-programmers) started using it, and when our company started taking more projects at the same time, it became evident that this was a bottleneck.
Distributing a game project on PC with Godot is rather easy. Drop the Godot binary in the same directory as the file, then compress the project directory and you are done.
It sounds simple, but there are probably a few reasons why the developer may not want to do this. The first one is that it may not be desirable to distribute loads of files. Some developers may not like curious users peeking at how the game was made, others may find it inelegant, and so on. Another reason is that the developer might prefer a specially-compiled binary, which is smaller in size, more optimized and does not include tools like the editor and debugger.
Finally, Godot has a simple but efficient system for creating DLCs as extra package files.
The same scenario on mobile platforms is a little worse. To distribute a project on those devices, a binary for each of those platforms is built, then added to a native project together with the game data.
This can be troublesome because it means that the developer must be familiarized with the SDK of each platform before even being able to export. While learning each SDK is always encouraged, it can be frustrating to be forced to do it at an undesired time.
There is also another problem with this approach: different devices prefer some data in different formats to run. The main example of this is texture compression. All PC hardware uses S3TC (BC) compression and that has been standardized for more than a decade, but mobile devices use different formats for texture compression, such as PVRTC (iOS) or ETC (Android).
After many attempts at different export workflows, the current one has proven to work the best. At the time of this writing, not all platforms are supported yet, but the supported platforms continue to grow.
To open the export menu, click the Export button:
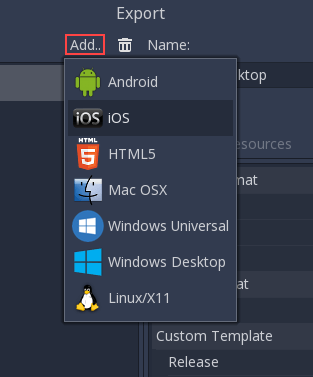
The export menu will open. However, it will be completely empty. This is because we need to add an export preset.
To create an export preset, click the Add… button at the top of the export menu. This will open a drop-down list of platforms to choose from for an export preset.
The default options are often enough to export, so tweaking them is usually not necessary. However, many platforms require additional tools (SDKs) to be installed to be able to export. Additionally, Godot needs export templates installed to create packages. The export menu will complain when something is missing and will not allow the user to export for that platform until they resolve it:
At that time, the user is expected to come back to the documentation and follow instructions on how to properly set up that platform.
Apart from setting up the platform, the export templates must be installed to be able to export projects. They can be obtained as a TPZ file (which is a renamed ZIP archive) from the .
Once downloaded, they can be installed using the Install Export Templates option in the editor:
When exporting, Godot makes a list of all the files to export and then creates the package. There are 3 different modes for exporting:
- Export all resources in the project
- Export selected resources (and dependencies)
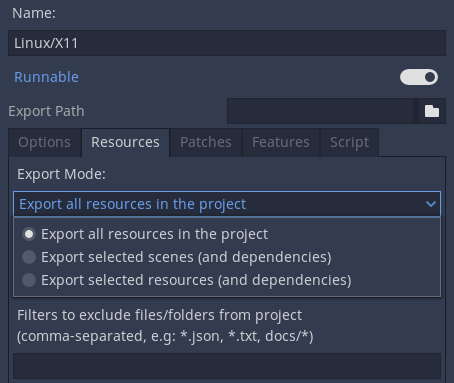
Export all resources in the project will export every resource in the project. Export selected scenes and Export selected resources gives you a list of the scenes or resources in the project, and you have to select every scene or resource you want to export.
In production, it is useful to automate builds, and Godot supports this with the --export and --export-debug command line parameters. Exporting from the command line still requires an export preset to define the export parameters. A basic invocation of the command would be:
This will export to , assuming there is a preset called “Windows Desktop” and the template can be found. The output path is relative to the project path or absolute; it does not respect the directory the command was invoked from.
You can also configure it to export only the PCK or ZIP file, allowing a single export to be used with multiple Godot executables. This takes place if the target name ends with .pck or .zip.
It is often useful to combine the flag with the --path flag, and to create a dedicated export preset for automated export:
godot --path path/to/project --export "pck" game_name.pck
Each format has its upsides and downsides. PCK is the default and recommended format for most use cases, but you may want to use a ZIP archive instead depending on your needs.
- Uncompressed format. Larger file size, but faster to read/write.
- Not readable and writable using tools normally present on the user’s operating system, even though there are third-party tools to extract and create PCK files.
ZIP format:
- Readable and writable using tools normally present on the user’s operating system. This can be useful to make modding easier (see also ).

