
Importing images
- BMP () - No support for 16-bit per pixel images. Only 1-bit, 4-bit, 8-bit, 24-bit, and 32-bit per pixel images are supported.
- DirectDraw Surface (
.dds) - If mipmaps are present in the texture, they will be loaded directly. This can be used to achieve effects using custom mipmaps. - OpenEXR (
.exr) - Supports HDR (highly recommended for panorama skies). - JPEG (
.jpg,.jpeg) - Doesn’t support transparency per the format’s limitations. - PNG () - Precision is limited to 8 bits per channel upon importing (no HDR images).
- Truevision Targa (
.tga) - SVG (
.svg, ) - SVGs are rasterized using when importing them. Support is limited; complex vectors may not render correctly. For complex vectors, rendering them to PNGs using Inkscape is often a better solution. This can be automated thanks to its command-line interface. - WebP (
.webp)
Note
If you’ve compiled the Godot editor from source with specific modules disabled, some formats may not be available.
Importing textures
The default action in Godot is to import images as textures. Textures are stored in video memory and can’t be accessed directly. This is what makes drawing them efficient.
Import options are vast:
This option makes Godot be aware of when a texture (which is imported for 2D as default) is used in 3D. If this happens, setting are changed so the texture flags are friendlier to 3D (mipmaps, filter and repeat become enabled and compression is changed to VRAM). Texture is also reimported automatically.
Images are one of the largest assets in a game. To handle them efficiently, they need to be compressed. Godot offers several compression methods, depending on the use case.
Compress Mode
- VRAM Compression: This is the most common compression mode for 3D assets. Size on disk is reduced and video memory usage is also decreased considerably (usually by a factor between 4 and 6). This mode should be avoided for 2D as it exhibits noticeable artifacts.
- Lossless Compression: This is the most common compression mode for 2D assets. It shows assets without any kind of artifacting, and disk compression is decent. It will use considerably more amount of video memory than VRAM Compression, though. This is also the recommended setting for pixel art.
- Lossy Compression: This is a good choice for large 2D assets. It has some artifacts, but less than VRAM and the file size is several times lower compared to Lossless or Uncompressed. Video memory usage isn’t decreased by this mode; it’s the same as with Lossless Compression or Uncompressed.
- Uncompressed: Only useful for formats that can’t be compressed (such as raw float images).
In this table, each of the four options are described together with their advantages and disadvantages ( = best, = worst):
HDR Mode
Godot supports high dynamic range textures (as .HDR or .EXR). These are mostly useful as high dynamic range equirectangular panorama skies (the internet has plenty if you search for them), which replace Cubemaps in Godot 2.x. Modern PCs support the BC6H VRAM format, but there are still plenty that do not.
If you want Godot to ensure full compatibility in terms of the kind of textures, enable the “Force RGBE” option.
Normal Map
Note that RGTC compression affects the resulting normal map image. You will have to adjust custom shaders that use the normal map to take this into account.
Note
Godot requires the normal map to use the X+, Y- and Z+ coordinates. In other words, if you’ve imported a material made to be used with another engine, you may have to convert the normal map so its Y axis is flipped. Otherwise, the normal map direction may appear to be inverted on the Y axis.
More information about normal maps (including a coordinate order table for popular engines) can be found .
Flags
There are plenty of settings that can be toggled when importing an image as a texture, depending on the use case.
This setting is most commonly used in 3D, and is therefore generally disabled in 2D. It sets UV coordinates going beyond the 0,0 - 1,1 range to “loop”.
Repeating can optionally be set to mirrored mode.
Filter
When pixels become larger than the screen pixels, this option enables linear interpolation for them. The result is a smoother (less blocky) texture. This setting can be commonly used in 2D and 3D, but it’s usually disabled when making pixel perfect games.
Mipmaps
When pixels become smaller than the screen, mipmaps kick in. This helps reduce the grainy effect when shrinking the textures. Keep in mind that, in older hardware (GLES2, mainly mobile), there are some requirements to use mipmaps:
- Texture width and height must be powers of 2
- Repeat must be enabled
Keep in mind the above when making phone games and applications, want to aim for full compatibility, and need mipmaps.
Anisotropic
When textures are near parallel to the view (like floors), this option makes them have more detail by reducing blurriness.
Godot uses Linear colorspace when rendering 3D. Textures mapped to albedo or detail channels need to have this option turned on in order for colors to look correct. When set to “Detect” mode, the texture will be marked as SRGB when used in albedo channels.
Some special processes can be applied to images when imported as textures.
Fix Alpha Border
This puts pixels of the same surrounding color in transition from transparency to non transparency. It helps mitigate the outline effect when exporting images from Photoshop and the like.
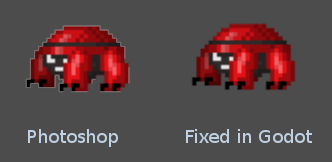
It’s a good idea to leave it on by default, unless specific values are needed.
Premultiplied Alpha
An alternative to fix darkened borders is to use premultiplied alpha. By enabling this option, the texture will be converted to this format. Keep in mind that a material will need to be created that uses the PREMULT ALPHA blend mode on canvas items that need it.
HDR as sRGB
A few HDR files are broken and contain sRGB color data. It is advised not to use them, but, in the worst-case scenario, toggling this option on will make them look right.
Reverses the image’s color. This is useful, for example, to convert a height map generated by external programs to depth map to use with Spatial Material.
Svg
Scale
This option only applies to SVG files. It controls the scale of the SVG image. The default scale (1.0) will make the imported SVG match its original design scale.

