
渲染
The Render Panel controls how particles appear when they are rendered.
- Material Index
- Set which of the object's materials is used to shade the particles.
- Parent
- Use a different object's coordinates to determine the birth of particles.
- Emitter
- When disabled, the emitter is no longer rendered. Activate the button Emitter to also render the mesh.
- Parents
- Render also parent particles if child particles are used.Children have a lot of different deformation options,so the straight parents would stand between their curly children.So by default Parents are not rendered if you activate Children.See .
- Unborn
- Render particles before they are born.
- Died
- Render particles after they have died.This is very useful if particles die in a collision Die on hit, so you can cover objects with particles.
When set to None, particles are not rendered.This is useful if you are using the particles to duplicate objects.
Halo
Halo particles are rendered as Halo Type Materials.
- Trail Count
- Set the number of trail particles. When greater than 1, additional options appear.
- Length in Frames
- Path timing is in absolute frames.
- Length
- End time of drawn path.
- Random
- Give path lengths a random variation.
The Line visualization mode creates (more or less thin)polygon lines with the strand renderer in the direction of particles velocities. The thicknessof the line is set with the parameter Start of the Strands shader(Material tab, Links and Pipeline panel).
- Tail
- Set the length of the particle's tail.
- Head
- Set the length of the particle's head.
- Speed
- Multiply the line length by particles' speed. The faster, the longer the line.
- Trail Count
- See description in .
Path
The Visualization panel for Path visualization.
The Path visualization needs a Hair particle system or particles.
- Strand render
- [Keypointstrands] Use the strand primitive for rendering. Very fast and effective renderer.
- Adaptive render
-
- Angle
- How many degrees path has to curve to produce another render segment(straight parts of paths need fewer segments).
- Pixel
- B-Spline
- Interpolate hair using B-Splines.This may be an option for you if you want to use low Render values.You loose a bit of control but gain smoother paths.
- Steps
- Set the number of subdivisions of the rendered paths (the value is a power of 2).You should set this value carefully,because if you increase the render value by two you need four times more memory to render.Also the rendering is faster if you use low render values (sometimes drastically).But how low you can go with this value depends on the waviness of the hair (the value is a power of 2).This means 0 steps give 1 subdivision,1 give 2 subdivisions, 2 —> 4, 3 —> 8, 4 —> 16, … n —> _n_2.
Timing
- Absolute Path Time
- Path timing is in absolute frames.
- Start
- Start time of the drawn path.
- End
- End time of the drawn path.
- Random
- Give the path length a random variation.Please see also the manual page aboutStrands for an in-depth description.
- Dupli Object
- The specified object is duplicated in place of each particle.
- Global
- Use object's global coordinates for duplication.
- Rotation
- Use the rotation of the object.
- Scale
- Use the size of the object.
Group
- Dupli Group
- The objects that belong to a group are duplicated sequentially in the place of the particles.
- Whole Group
- Use the whole group at once, instead of one of its elements, the group being displayed in place of each particle.
- Pick Random
- The objects in the group are selected in a random order, and only one object is displayed in place of a particle.Please note that this mechanism fully replaces old Blender particles system using parentageand DupliVerts to replace particles with actual geometry.This method is fully deprecated and does not work anymore.
- Use Count
- Use objects multiple times in the same groups.Specify the order and number of times to repeat each object with the list view that appears.You can duplicate an object in the list with the Plus button,or remove a duplicate with the Minus button.
- Use Global
- Use object's global coordinates for duplication.
- Rotation
- Use the rotation of the objects.
- Scale
- Use the size of the objects.
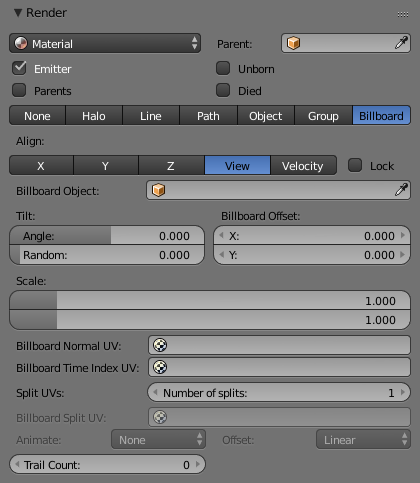 Billboard visualization for particles.
Billboards are aligned square planes. They are aligned to the camera by default,but you can choose another object that they should be aligned to.
If you move a billboard around its target, it always faces the center of its target.The size of a billboard is set with the parameter Size of the particle(in Blender Units).You can use them e.g. for ),or to replace Halo visualization.Everything that can be done with a halo can also be done with a billboard.But billboards are real objects, they are seen by ray tracing,they appear behind transparent objects,they may have an arbitrary form and receive light and shadows.They are a bit more difficult to set up and take more render time and resources.
Texturing billboards (including animated textures with alpha) is done by using UV coordinatesthat are generated automatically for them so they can take an arbitrary shape.This works well for animations, because the alignment of the billboards can be dynamic.The textures can be animated in several ways:
- Depending on the particle lifetime (relative time).
- Depending on the particle starting time.
Depending on the frame (absolute time).You can use different sections of an image texture:
Depending on the lifetime of the billboard.
- Depending on the emission time.
- Depending on align or tilt.Since you use normal materials for the billboard you have all freedoms in mixing textures toyour liking. The material itself is animated in absolute time.
An interesting alternative to billboards are in certain cases strands,because you can animate the shape of the strands.Because this visualization type has so much options it is explained in greater detail below.
- Align
You can limit the movement with these options. How the axis is prealigned at emission time.
- X, Y, Z
- Along the global X, Y, Z axis respectively.
- No prealignement, normal orientation to the target.
- Velocity
- Along the speed vector of the particle.
- Lock
- Locks the align axis, keeps this orientation, the billboard aligns only along one axis to its target.
- Billboard Object
- The target object that the billboards are facing. By default, the active camera is used.
- Tilt Angle
- Rotation angle of the billboards planes. A tilt of 1 rotates by 180 degrees (turns the billboard upside down).
- Random
- Random variation of tilt.
- Offset X
- Offset the billboard horizontally in relation to the particle center, this does not move the texture.
- Offset Y
- Offset the billboard vertically in relation to the particle center.
- UV Channels
- Billboards are just square polygons.To texture them in different ways we have to have a way to setwhat textures we want for the billboards and how we want them to be mapped to the squares.These can then be set in the texture mapping buttons to set wanted textures for different coordinates.You may use three different UV maps and get three different sets of UV coordinates,which can then be applied to different (or the same) textures.
- Billboard Normal UV
- Coordinates are the same for every billboard, and just place the image straight on the square.
- Billboard Time-Index (X-Y)
Coordinates actually define single points in the texture plane withthe X axis as time and Y axis as the particle index.For example using a horizontal blend texture mapped to color from white to black will give particlesthat start off as white and gradually change to black during their lifetime.On the other hand a vertical blend texture mapped to color from white to blackwill make the first particle to be white and the last particle to be blackwith the particles in between a shade of gray.The animation of the UV textures is a bit tricky.The UV texture is split into rows and columns (N times N). The texture should be square.You have to use UV Split in the UV channel and fill in the name of the UV map.This generated UV coordinates for this layer.
Split UV's
- The amount of rows/columns in the texture to be used.Coordinates are a single part of the UV Split grid, which is an n × n grid over the whole texture.What the part is used for each particle and at what time is determined by the Offset andAnimate controls. These can be used to make each billboard unique or to use an "animated" texture forthem by having each frame of the animation in a grid in a big image.
- Billboard Split UV
- Set the name of the UV map to use with billboards(you can use a different one for each UV Channel). By default, it is the active UV map(check the Object Data tab in the Properties editor).
- Animate
Select menu, indicating how the split UVs could be animated (changing from particle to particle with time):
- None
- No animation occurs on the particle itself, the billboard uses one section of the texture in its lifetime.
- Age
- The sections of the texture are gone through sequentially in particles' lifetimes.
- Angle
- Change the section based on the angle of rotation around the Align to axis,if View is used the change is based on the amount of tilt.
- Frame
- The section is changes according to the frame.
- Offset
Specifies how to choose the first part(of all the parts in the n×n grid in the texture defined by the UV Split number) for all particles.
- None
- All particles start from the first part.
- Linear
- First particle will start from the first part and the last particle will start from the last part,the particles in between will get a part assigned linearly from the first to the last part.
- Random
- Give a random starting part for every particle.
- Trail Count

