
碰撞
- The Cloth object must be told to participate in collisions.
- Optionally (but recommended) tell the cloth to collide with itself.
- The other objects must be mesh objects.
- The other objects may move or be themselves deformed by other objects (like an armature or shape key).
- The other mesh objects must be told to deflect the cloth object.
- The blend-file must be saved in a directory so that simulation results can be saved.
- You then Bake the simulation. The simulator computes the shape of the cloth for a frame range.
- You can then edit the simulation results, or make adjustments to the cloth mesh, at specific frames.
- You can make adjustments to the environment or deforming objects,and then re-run the cloth simulation from the current frame forward.
Reference
Cloth Collisions panel.
Now you must tell the Cloth object that you want it to participate in collisions.For the cloth object, locate the Cloth Collision panel, shown to the right:
- Quality
- A general setting for how fine and good a simulation you wish.Higher numbers take more time but ensure less tears and penetrations through the cloth.
- Distance
- As another object gets this close to it (in Blender Units),the simulation will start to push the cloth out of the way.
- Repel
- Repel Distance
- Maximum distance to apply repulsion force. Must be greater than minimum distance.
- Friction
- A coefficient for how slippery the cloth is when it collides with the mesh object.For example, silk has a lower coefficient of friction than cotton.
Real cloth cannot permeate itself, so you normally want the cloth to self-collide.
- Enable Self Collisions
- Click this to tell the cloth object that it should not penetrate itself. This adds to simulation compute time,but provides more realistic results. A flag, viewed from a distance does not need this enabled,but a close-up of a cape or blouse on a character should have this enabled.
- Quality
- For higher self-collision quality just increasethe Quality and more self-collision layers can be solved.Just keep in mind that you need to have at least the sameCollision Quality value as the Quality value.
- Distance
- If you encounter problems, you could also change the Min Distance value for the self-collisions.The best value is 0.75; for fast things you better take 1.0. The value 0.5 is quite risky(most likely many penetrations) but also gives some speed-up.Regression blend-file:.
Shared Layers
Suppose you have two objects: a pair of pants on layers 2 and 3,and your character mesh on layers 1 and 2.You have enabled the pants as cloth as described above.You must now make the character "visible" to the Cloth object,so that as your character bends its leg, it will push the cloth.This principle is the same for all simulations;simulations only interact with objects on a shared layer. In this example,both objects share layer 2.
To view/change an object's layers,RMB click to select the object in Object Mode in the 3D View.M to bring up the "Move Layers" pop-up,which shows you all the layers that the object is on. To put the object on a single layer,LMB click the layer button. To put the object on multiple layers,Shift-LMB the layer buttons. To remove an object from a selected layer,simply Shift-LMB the layer button again to toggle it.
If your colliding object is not a mesh object, such as a NURBS surface, or text object,you must convert it to a mesh object. To do so, select the object in object mode,and in the 3D View header, select Object ‣ Convert Object TypeAlt-C, and select Mesh from the pop-up menu.
 Collision settings.
In the Properties editor, Object tab and Physics tab, locate the Collision panelshown to the right. It is also important to note that this collision panel is used to tellall simulations that this object is to participate in colliding/deflecting other objectson a shared layer (particles, soft bodies, and cloth).
Warning
There are three different Collision panels, all found in the Physics tab.The first (by default), a tab beside the Fields panel, is the one needed here. The second panel,a tab in the Soft Body group, concern soft bodies (and so has nothing to do with cloth).And we have already seen the last one, by default a tab beside the Cloth panel.
Mesh Object Modifier Stack
Collision stack.
The object's shape deforms the cloth,so the cloth simulation must know the "true" shape of that mesh object at that frame.This true shape is the basis shape as modified by shape keys or armatures. Therefore,the Collision Modifier must be after any of those.The image to the right shows the Modifiers panel for the Character mesh object(not the cloth object).
Reference
| Panel: | Physics ‣ Cloth Cache |
|---|
Cache settings for cloth are the same as with other dynamic systems.See Particle Cache for details.
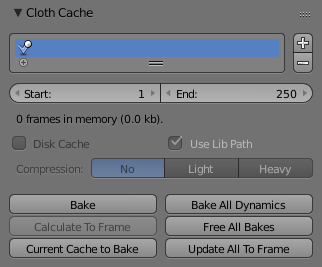 After baking.
You cannot change Start or End without clearing the bake simulation.When the simulation has finished, you will notice you have the option to free the bake,edit the bake and re-bake:
There are a few things you will probably notice right away. First,it will bake significantly slower than before,and it will probably clip through the box pretty badly as in the picture on the right.
The cache contains the shape of the mesh at each frame. You can edit the cached simulation,after you have baked the simulation and pressed the Bake Editing button.Just go to the frame you want to fix and Tab into Edit Mode.There you can move your vertices using all of Blender's mesh shaping tools. When you exit,the shape of the mesh will be recorded for that frame of the animation.If you want Blender to resume the simulation using the new shape going forward,LMB click Rebake from next Frame and play the animation.Blender will then pick up with that shape and resume the simulation.
Edit the mesh to correct minor tears andplaces where the colliding object has punctured the cloth.
If you add, delete, or extrude vertices in the mesh, Blender will take the new mesh asthe starting shape of the mesh back to the first frame of the animation,replacing the original shape you started with,up to the frame you were on when you edited the mesh. Therefore,if you change the content of a mesh, when you press Tab out of Edit Mode,you should unprotect and clear the cache so that Blender will make a consistent simulation.
Troubleshooting
If you encounter some problems with collision detection, there are two ways to fix them:
- The fastest solution is to increase the Min Distance setting under the Cloth Collision panel.This will be the fastest way to fix the clipping; however, it will be less accurate and will not look as good.Using this method tends to make it look like the cloth is resting on air, and gives it a very rounded look.
- A second method is to increase the Quality (in the first Cloth panel).This results in smaller steps for the simulator andtherefore to a higher probability that fast-moving collisions get caught.You can also increase the Collision Quality to perform more iterations to get collisions solved.
- The Cloth is torn by the deforming mesh — he "Hulks Out": Increase its structural stiffness(Structure Stiffness setting, Cloth panel), very high, like 1000.
Note
Subdivision Surface Modifier

